Welcome to the fascinating world of Arduino! If you have ever been curious about experimenting with electronics, creating your own projects, or diving into the realm of Internet of Things (IoT), then Arduino is your gateway. Whether you’re a hobbyist, a student, or an aspiring inventor, this open-source platform offers endless possibilities for bringing your ideas to life.
In this post, we will take you on a journey through the basics of getting started with Arduino. From downloading and installing the software to configuring the IDE (Integrated Development Environment) and uploading code onto your board – we’ve got you covered. So let’s roll up our sleeves and unleash our creativity as we embark on this exciting adventure together!
But before we dive into all that technical stuff, let’s start by understanding what exactly Arduino is and why it has become such a popular choice among DIY enthusiasts worldwide. Let’s get ready to unlock the power of innovation with Arduino Board.!
What is Arduino?
What is Arduino? It’s not just a fancy word; it’s a versatile microcontroller board that opens up a world of possibilities. Developed in Italy, Arduino has gained immense popularity due to its simplicity and flexibility. At its core, it consists of a single-board with an integrated processor and various input/output pins.
Arduino isn’t just for the tech-savvy or experienced programmers – it’s designed for everyone! Whether you’re a complete beginner or an advanced user, Arduino provides an accessible platform to bring your ideas to life. With its vast community support, online tutorials, and extensive documentation, you’ll never feel alone on your journey.
The beauty of Arduino lies in its ability to interact with the physical world through sensors and actuators. Simply put, it allows you to create projects that can sense their environment and respond accordingly – imagine building your own weather station or even controlling lights using voice commands!
One of the main reasons behind Arduino’s popularity is its open-source nature. This means that anyone can access the design files, modify them according to their needs, and share their creations with others. The possibilities are truly endless when creative minds collaborate!
So whether you want to build robots, automate everyday tasks around the house or explore IoT applications – Arduino is here to empower you. It encourages experimentation and learning by providing a simple yet powerful toolset for turning imagination into reality.
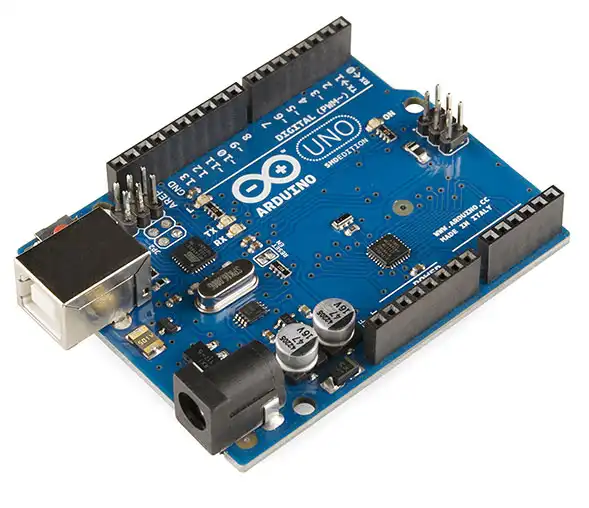
Arduino is a microcontroller that is programmable and an open-source device. You may have seen some gadgets or remote control devices such as electronic toys, TV remotes, electronic signals or vending machines, etc. many times.
In this tutorial, we are using the Arduino Uno Board because the Arduino Uno is easy to use for a beginner and has efficient pins to use.
To know more about Arduino Uno Pinout, Schematics, Technical Specification read us this article: Arduino Uno.
Step 1: Download and Install the Arduino IDE Software
To get started with Arduino, the first step is to download and install the Integrated Development Environment (IDE) software. The Arduino IDE is a cross-platform application that allows you to write, compile, and upload code to your Arduino board.
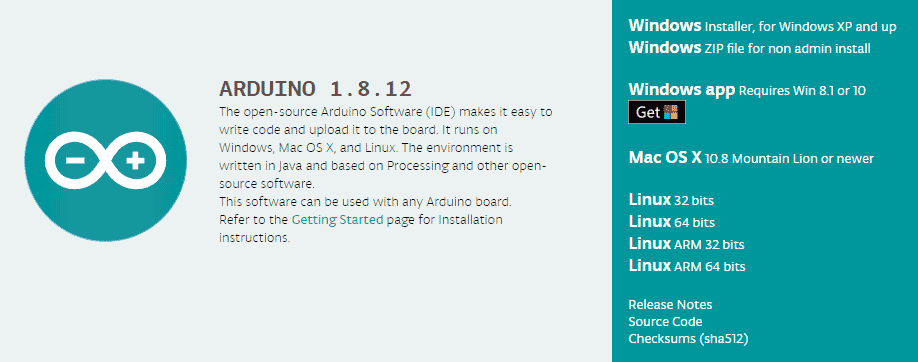
To download the IDE software, simply visit the official Arduino website and navigate to the “Software” section. From there, you can select the appropriate version for your operating system –
- Window XP 32 or 64 bit or more
- Linux 32 or 64 bit
- Mac os x or higher
Once you have downloaded the installer file, run it and follow the installation instructions. The process is usually straightforward and does not require any advanced technical skills.
To program the Arduino we will require software called Arduino IDE (Integrated Development Software). This software is open-source and free to download. You can download this software from Arduino Official Site.
If you have a reliable Internet connection, you should use the online IDE (Arduino Web Editor).
In addition to its simplicity and ease of use, another advantage of using the Arduino IDE is its compatibility with a wide range of third-party libraries. These libraries extend its functionality by providing ready-to-use functions for controlling additional hardware components or performing complex tasks without having to write all of the code from scratch.
Downloading and installing the Arduino IDE sets up everything you need in order to begin working on exciting projects with your Arduino board. So go ahead – take that first step towards unleashing your creativity in electronics!
Step 2: Know about Arduino IDE
The Arduino Integrated Development Environment (IDE) is a software platform that serves as the primary tool for programming and uploading code to your Arduino board.
One of the key features of the Arduino IDE is its simplicity. The clean and intuitive layout allows users to write and edit code effortlessly. It also includes helpful features like syntax highlighting, auto-indentation, and code suggestions, which can greatly speed up your coding process.
Furthermore, the IDE supports multiple programming languages including C++ and Wiring. This flexibility enables you to use familiar programming constructs while taking advantage of the vast libraries available within the Arduino ecosystem.
In addition to these features, the Arduino IDE offers built-in serial monitor functionality. This powerful tool allows you to debug your programs by monitoring data sent between your computer and the connected hardware in real-time.
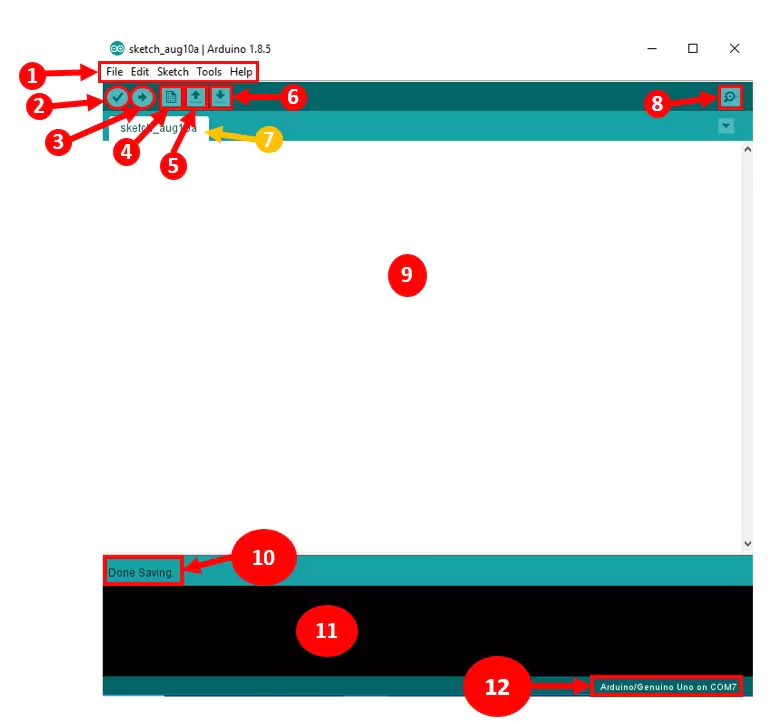
- Menu Bar: Gives you access to the tools needed for creating and saving Arduino sketches.
- Verify: Compiles your code and checks for errors in spelling or syntax.
- Upload: This button uploads the program to the connected Arduino. Lights on the board will blink rapidly when uploading.
- New: Opens up a new window containing a blank sketch.
- Save: This saves the sketch you currently have open.
- Open: Allows you to open a saved sketch or one from the stored examples.
- Sketch Name: When the sketch is saved, the sketch name is displayed here.
- Serial Monitor: When the board is connected, it will display the serial information of your Arduino.
- Code Area: This area is where you compose the code of the sketch that tells the board what to do.
- Message Area: This area tells you the status of saving, code compiling, errors and more.
- Text Console: The text console shows the details of the error message, size of the program that was compiled and additional info.
- Board and Serial Port: It displays the connected board name and port number.
Step 3: Configure Arduino IDE
Configuring the Arduino IDE is an essential step to get started with your Arduino projects. Once you have downloaded and installed the IDE software, it’s time to set it up for your specific board.
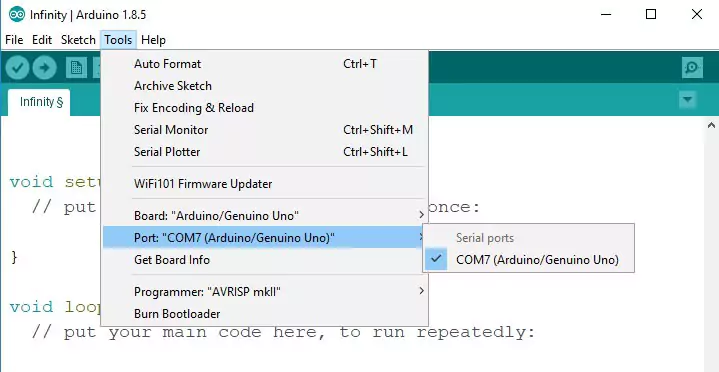
To configure the Arduino IDE, open the software and navigate to the “Tools” menu. From there, select the board you are using. Whether it’s an Uno, Nano, or Mega, make sure you choose the correct option.
Now connect your Arduino to your computer with the help of USB cable. Plug one end of the USB cable to the Arduino Uno and then the other end of the USB to your computer’s USB port.
Once the board is connected, you will need to go to Tools » Board » Arduino Uno.
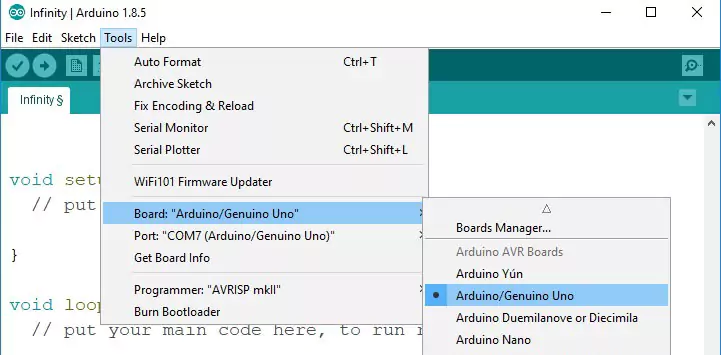
Select COM port on which Arduino is connected. To select the port, go to Tools » Port » select port name.
If at any point during this process something goes wrong or doesn’t work as expected, don’t panic! Troubleshooting is part of learning. Take some time to double-check all connections and settings before seeking further assistance.
Having completed these configuration steps successfully means that you are ready to unleash your creativity with endless possibilities in building exciting projects with Arduino!
Step 4: Uploading Code
After writing your code in the Arduino IDE, it’s time to upload it to your Arduino board and see your project come to life! But how exactly do you upload code? Don’t worry, it’s easier than you might think.
First, make sure your Arduino board is connected to your computer via a USB cable. Then, click on the “Upload” button in the toolbar of the IDE. The software will compile your code into machine-readable instructions that can be understood by the microcontroller on your board.
During this process, you might see some messages appearing at the bottom of the IDE window. These messages indicate whether or not the uploading process was successful. If everything goes smoothly, you’ll see a “Done uploading” message.
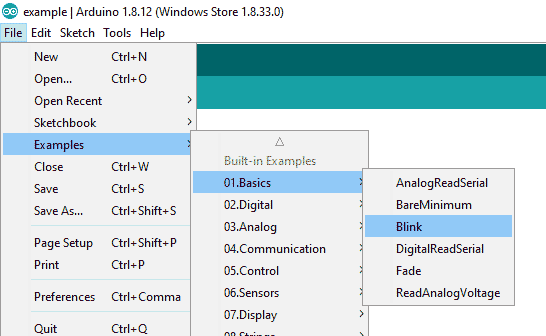
We load a simple code that turns on and off the built-in led of Arduino. Now open the LED blink example code from Files » Examples » 01 Basics » Blink and click on the Upload button. After a few seconds of code compiled, the RX and TX led on the board will be flashing.
After a few seconds, the code upload finishes. Now you can see the pin 13 LED will be blinking.
If you can’t find the code then upload the following code.
Step 5: Connecting an External LED with Arduino
Connecting an External LED is a key step in getting started with Arduino. It allows you to control external components and see the output of your code in the form of light. So let’s dive into it!
To connect an external LED, you will need a few basic components.
- LED.
- Resistor 1 Kohms (kΩ).
- Breadboard.
- Jumper Wires.
Grab your Arduino board and locate the digital pin labelled “13”. This pin is equipped with a built-in LED that can be used for testing purposes.
Next, take your breadboard and place the LED on it. The longer leg of the LED is called the anode, while the shorter one is known as the cathode. Connect the anode to a resistor (around 220-470 ohms) and then connect the other end of this resistor to digital pin 13 on your Arduino.
Now connect one end of another wire to GND (ground) on your Arduino board and attach its other end to the cathode of your LED.
That’s it! You have successfully connected an external LED to your Arduino board. Now when you upload a program that uses Digital Pin 13, you will see the external LED blinking accordingly.
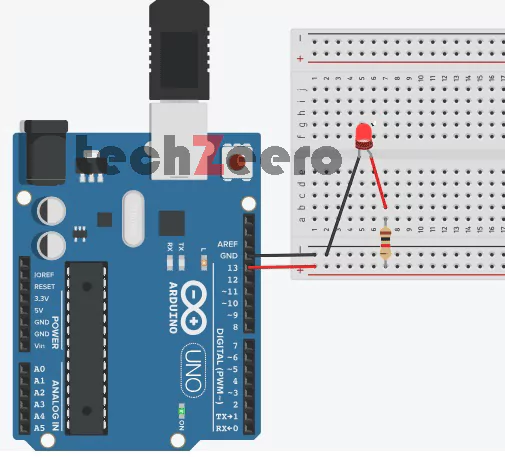
Step 6: Circuit Diagram for getting started with Arduino
Connect the long leg of the LED with a resistor and another leg to GND of Arduino. Now connect another wire of resistor to the D13 pin of Arduino.
Structure of the Arduino Program
The Arduino program consists of three parts: structure, value, and function. Commonly, Arduino programs also called sketches.
int ledpin = 13;  // digital pin 13

void setup()    //setup() method runs once, when the sketch starts
{
  pinMode(ledpin, OUTPUT);  //initialize the digital pin as an output
}

void loop()   //loop() method runs over and over again
{
  digitalWrite(ledpin, HIGH);   //turn LED on
  delay (1000);       //wait a second
  digitalWrite(ledpin, LOW);    // turn LED off
  delay(1000);          //wait a second
}
The code starts from the top and carries out the instruction sequentially. First, the setup() function will execute and then goes through the code in loop() function. When execution of loop() function ends, it goes back to the beginning of the loop.
This example continuously flashes an LED HIGH and LOW outputs to a pin.
The const keyword stands for constant. It is a variable qualifier that modifies the behavior of the variable, making a variable “read-only”. That means the variable value is not changeable but it can be used like any other variable of the same type.
The pinMode() function is used to configure a specific pin to behave as an input or an output.
To give a HIGH or LOW value to a digital pin we use digitalWrite() function.
When we do delay(1000) our Arduino stops on that line for 1 second. The delay() function is a blocking function. Blocking functions prevent a program from doing anything else until that particular task has been completed.