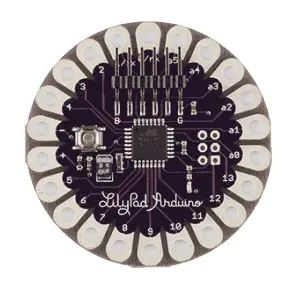
The Arduino Lilypad is not your typical microcontroller board. It’s designed specifically for wearable electronics, making it perfect for projects that involve integrating technology into clothing and accessories. Unlike traditional Arduino boards, the Lilypad is sewable and washable, allowing you to embed it seamlessly into fabric.
The Arduino LilyPad Board is predicated on the ATmega168V (the low-power version of the ATmega168) or the ATmega328V.
With its compact size and flexibility, the Lilypad opens up a world of creative possibilities for makers, designers, and tech enthusiasts alike. Whether you’re looking to create interactive garments, smart textiles, or sensor-based accessories – the Arduino Lilypad has got you covered.
This versatile board contains everything you need to bring your wearable tech ideas to life. From LED lights to sensors like accelerometers and temperature sensors, the Lilypad offers a wide range of components that can be easily connected to create personalized projects tailored to your specific needs.
This board was designed and developed by Leah Buechley and SparkFun electronics.
This board has 14 digitals I/O pins and 6 analog pins.
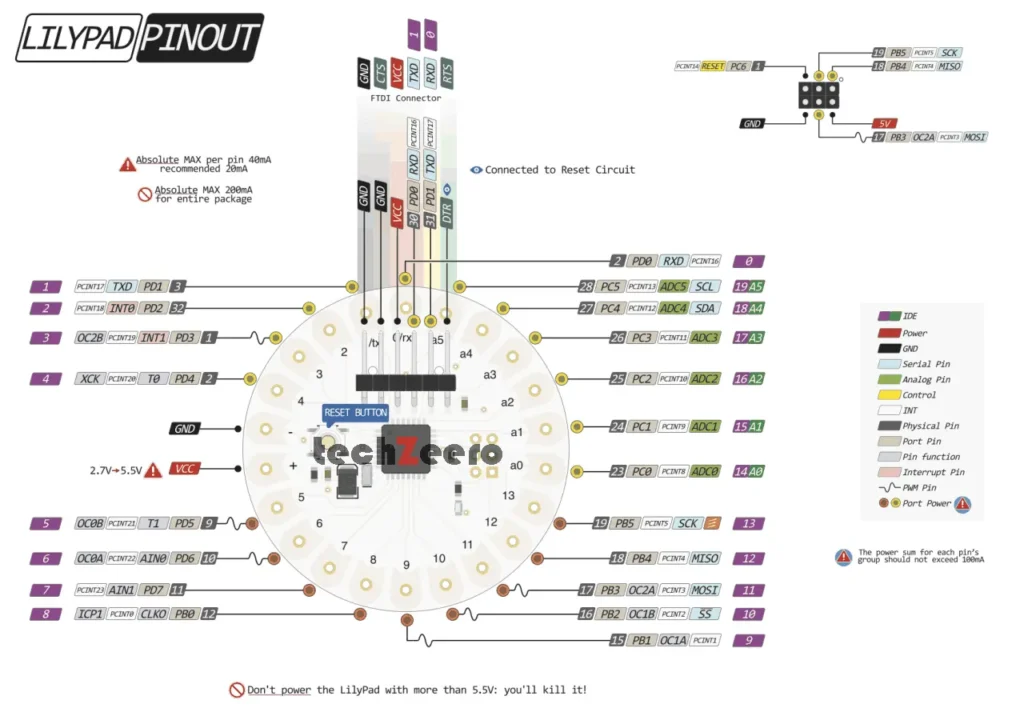
Arduino Lilypad Pinout
The pinout of the Arduino Lilypad is a crucial aspect to understand when working on projects with this versatile microcontroller board. The Lilypad has a total of 14 digital pins, which can be used for input or output functions. These pins are labeled from D0 to D13.
In addition to the digital pins, there are also six analog input pins marked as A0 through A5. These analog pins allow for precise measurement of signals such as light intensity or temperature.
Furthermore, the Lilypad features power and ground pins necessary for providing electricity to the board and connecting components like sensors or LEDs. Understanding the pinout layout is essential for proper circuit connections and programming functionalities.
Technical Specifications
The Arduino Lilypad is a compact and versatile microcontroller board designed for wearable technology and e-textile projects. Let’s dive into its specifications to understand its capabilities better.
With an ATmega328P MCU running at 8MHz, the Lilypad boasts low power consumption ideal for battery-operated designs. It has 14 digital input/output pins, six of which can be used as PWM outputs, perfect for controlling LEDs or motors.
Additionally, it features six analog inputs for sensor integration and onboard power regulation to support various power sources like coin cell batteries or rechargeable LiPo cells. The Lilypad supports programming via the Arduino IDE through a mini-USB connector.
Moreover, this board is compatible with conductive thread connections instead of traditional soldered components, making it suitable for soft circuits in wearable tech applications. Its small form factor allows for seamless integration into clothing or fabric-based projects easily.
| Microcontroller | ATmega168 or ATmega328V |
| Operating Voltage | 2.7-5.5v |
| Input Voltage (recommended) | 2.7-5.5v |
| Digital I/O Pins | 14 |
| Analog Input Pins | 6 |
| DC Current per I/O Pin | 40 mA |
| Flash Memory | 16 KB and 2 KB used by bootloader from 16KB |
| SRAM | 1 KB |
| EEPROM | 512 Bytes |
| Clock Speed | 8 MHz |
How to Use the Arduino Lilypad
To start using the Arduino Lilypad, first, ensure you have all the necessary components like conductive thread, sensors, and a power source. Next, familiarize yourself with the pin configuration to connect your electronic modules correctly.
Begin by writing your code in the Arduino IDE and uploading it to the Lilypad using a USB microcontroller. Remember to select the correct board type before uploading your sketch.
Once you’ve uploaded your code successfully, test your project by connecting it to power. The Lilypad is designed for wearable electronics; consider incorporating fabric or other materials into your design for a seamless integration.
Experiment with different sensors and actuators to create interactive projects such as light-up clothing or temperature-sensing accessories. The possibilities are endless when you unleash your creativity with the versatile Arduino Lilypad!
Projects that can be done with the Arduino Lilypad
Looking to get creative with your Arduino Lilypad? There are endless possibilities for projects you can dive into with this versatile microcontroller!
- One exciting project is designing interactive wearable tech, like a light-up bracelet or a temperature-sensing scarf. Imagine the cool factor of garments that respond to the environment!
- If you’re into DIY accessories, consider making custom LED earrings or a programmable fabric patch that lights up when you receive a notification on your phone.
- For those interested in health and wellness, try creating a fitness tracker using sensors connected to the Lilypad. Monitor steps taken, calories burned, or even track sleep patterns – all with your own handmade device!
- Experimenting with smart textiles is another fun avenue. Incorporate conductive thread and LEDs into fabrics to design clothes that light up or change color based on external stimuli.
Pros and Cons of using the Arduino Lilypad
Pros of using the Arduino Lilypad include its compact size, making it ideal for wearable tech projects. The sewable design allows for creative and flexible applications in fashion tech and e-textiles. Its compatibility with various sensors and actuators opens up a wide range of possibilities for innovative projects.
On the flip side, one con is that the Lilypad has limited processing power compared to other Arduino boards, which may constrain complex programming tasks. Additionally, the lack of built-in USB connectivity can be an inconvenience when uploading sketches or debugging code. However, these limitations can be overcome with proper planning and workaround solutions.