Introduction to LEDs with Arduino
LEDs, or Light Emitting Diodes, have revolutionized the world of electronics with their energy efficiency, long lifespan, and versatility. When coupled with Arduino, a popular open-source electronics platform, the possibilities are endless. Whether you’re a tech enthusiast or a DIY maker, mastering LEDs with Arduino can add a whole new dimension to your projects.
An Arduino has enough pins to control multiple LEDs at once. In this tutorial, we will use 5 LEDs at once and control their blinking time simultaneously.
We execute two different codes on Arduino Uno and check their output.
LEDs, or light-emitting diodes, have become a staple in electronics and DIY projects due to their efficiency, flexibility, and vibrant colors. When paired with Arduino, an open-source electronics platform, the possibilities for creating stunning LED effects are endless. Whether you’re a seasoned maker or a beginner, mastering LEDs with Arduino can open up a world of creative opportunities in lighting and visual effects for your projects.
Here some more tutorials for you:
- Getting started with Arduino
- How to use an LCD Display with Arduino
- Arduino Generating Random Numbers
- LED Blinking Control by Potentiometer
- How to use an RGB LED with Arduino
Components List
- Arduino Uno
- LED’s
- Resistors (300Ω – 1 KΩ)
- Breadboard
- Jumper Wires
Setting up the Hardware
Setting up the hardware for controlling multiple LEDs with Arduino is a crucial first step in your LED project. To get started, gather all the necessary components – an Arduino board, LEDs, resistors, jumper wires, and a breadboard.
Begin by placing the Arduino board on a stable surface and connecting it to your computer using a USB cable. Next, carefully insert the LEDs into the breadboard ensuring they are properly aligned.
Now connect one leg of each LED to a digital pin on the Arduino using jumper wires and add resistors to limit current flow. Double-check all connections before powering up your setup.
To power the circuit, plug in your Arduino via USB or an external power source. Once powered up, you’re ready to move on to writing code for controlling the LEDs!
Using the breadboard, connect the negative leg of each LED to a ground pin on the Arduino board. Then, connect the positive leg of each LED to the resistor. Next, connect the resistor to a digital pin on the Arduino board. Connect the following Arduino with LEDs respectively.
| LEDs Leg | Arduino Pins |
|---|---|
| All LED Cathodes | GND |
| RED Anode | D7 |
| BLUE Anode | D6 |
| ORANGE Anode | D5 |
| GREEN Anode | D4 |
| YELLOW Anode | D3 |
Always connect a resistor of 1KΩ with an LED. The bigger one wire of led is +ve and the other is -ve.
Circuit Diagram for Multiple LEDs with Arduino
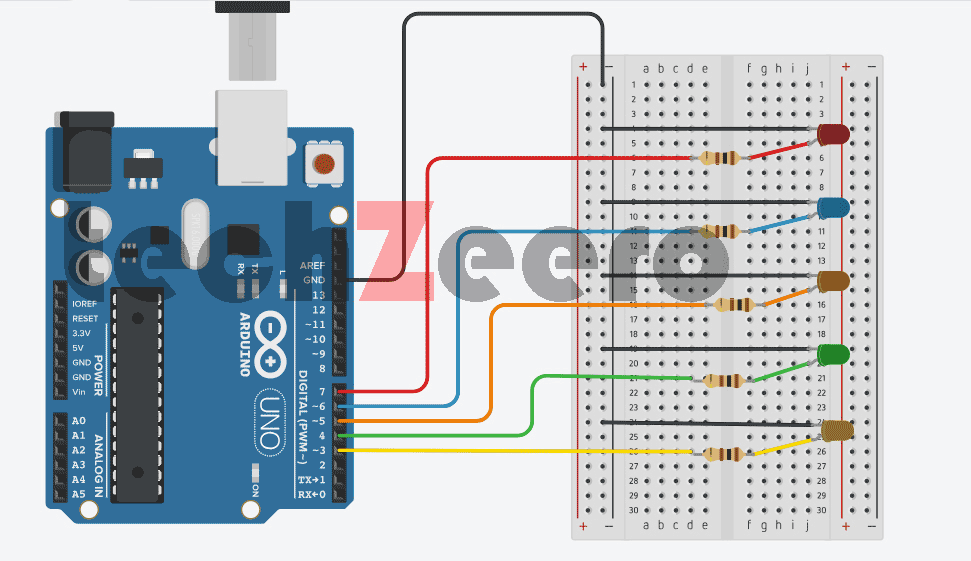
Understand the circuit diagram given above, connecting the LEDs from the resistor and then the Arduino pins. Before connecting LEDs using breadboard you have the knowledge of how a breadboard works. Follow the above circuit diagram to controlling multiple LEDs with Arduino.
Writing the Code for LEDs with Arduino
When it comes to harnessing the power of Arduino to control multiple LEDs, writing the code is where the magic happens. It’s like composing a symphony of light and creativity in the digital world.
Writing code for LED control involves understanding how to manipulate pins on the Arduino board to turn LEDs on and off. With just a few lines of code, you can create mesmerizing patterns and effects that illuminate your projects.
By using functions like digitalWrite() and delay(), you can precisely dictate when each LED should light up or remain dark. This level of control allows for endless possibilities in designing unique lighting sequences.
Experimenting with loops and arrays opens up even more opportunities for dynamic LED displays. By iterating through lists of LEDs, you can orchestrate intricate patterns with ease.
In this stage of the process, attention to detail is key. One misplaced character or semicolon could throw off your entire light show. Stay focused, test often, and let your imagination guide your coding journey towards dazzling LED creations.
Now that the circuit is set up, we can write the code to control the LEDs. The code will involve turning on and off each LED in a specific sequence to create the desired lighting effect. You can find sample code and tutorials online to help you get started.
Output of Code
After setting up the hardware and writing the code, it’s time to see the magic happen – the output. Once you upload your code to the Arduino board and power it up, watch as your LEDs come to life in a mesmerizing display of light. The satisfaction of seeing your project work as intended is truly rewarding.
As each LED lights up according to your programming, you can experiment with different patterns and colors to create unique lighting effects. Whether it’s a simple blinking sequence or an intricate light show, the possibilities are endless with LED control using Arduino.
The beauty of controlling LEDs with Arduino lies in its versatility and ease of customization. You have full control over how each LED behaves, allowing you to unleash your creativity and bring your ideas to life through dynamic lighting displays. Let your imagination run wild as you explore the endless possibilities of LED control with Arduino.
Code 2
Let’s dive into Code 2, a powerful tool in the world of Arduino and LED control. This code allows you to seamlessly manage multiple LEDs with efficiency and precision. By utilizing loops and arrays, you can streamline the process of controlling numerous LEDs simultaneously.
Output
Troubleshooting / Errors
Once the code is written, upload it to the Arduino board and test the LED array. If any LEDs are not lighting up or are not following the desired sequence, check your circuit and code for any errors. It may take some trial and error to get the desired effect, but with some patience and persistence, you will be able to create a functioning LED array.
- The LED’s inserted backward, so ensure that led’s big leg connected to +ve.
- LED’s burst problem. So the use of a resistor is mandatory.
- Wire connections may be loose.
You’ve seen how we control multiple LEDs with Arduino. Controlling multiple LEDs with Arduino is a very easy task and we can also add more LEDs and with different code algorithms. So now it’s your turn to make more awesome projects using Arduino and LEDs.
Conclusion
In the world of DIY electronics, Arduino boards offer endless possibilities for creativity and innovation. By learning how to control multiple LEDs with Arduino, you’ve taken a step towards mastering the art of physical computing.
Remember, practice makes perfect in the world of Arduino programming – so keep tinkering, experimenting, and expanding your skills. With dedication and passion, there’s no limit to what you can achieve with LEDs and Arduino by your side. Happy making!