Introduction to LCD Displays and Arduino
Welcome to the exciting world of combining LCD display with Arduino! If you’re looking to add a visual element to your Arduino projects, using an LCD display is a fantastic way to do so.
In this blog post, we will guide you through everything you need to know about setting up and utilizing an LCD display 16×2 with Arduino. Get ready to dive into the fascinating realm of electronics and coding as we explore how these two components can work together seamlessly. Let’s get started!
The full form of LCD Display is Liquid Crystal Display and generally used in many electronics applications.
In Arduino projects to show the sensor readings, status, messages we use LCD Display.
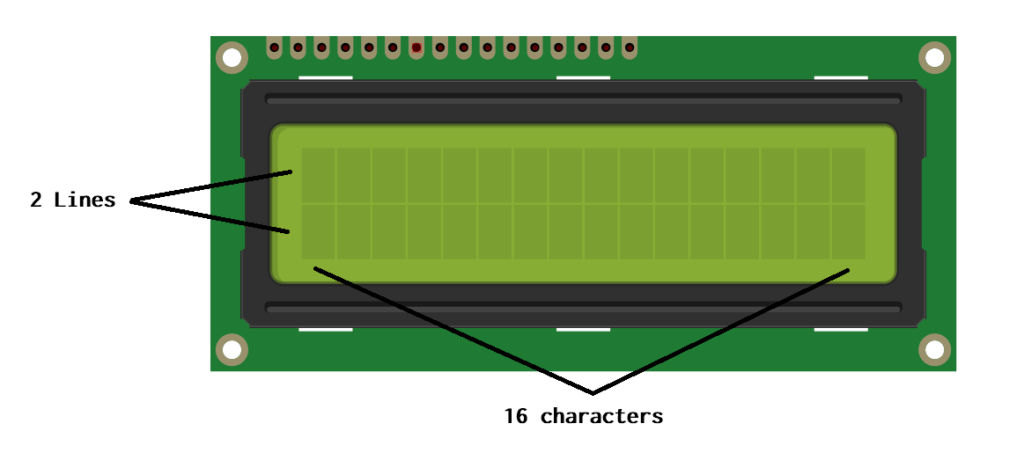
In LCD 16×2 there are 2 lines with 16 characters in each line. Each character is made up of a 5×8 (column x row) pixel matrix.
A potentiometer is also used along with LCD Display for adjusting the brightness of LCD.
Here some more tutorials for you:
- Display Potentiometer Readings on LCD Display
- Ultrasonic Sensor with Arduino
- 7 Segment Display with Arduino
- LDR Sensor with Arduino
- PIR Sensor With Arduino
Components Needed
To get started with using an LCD display with Arduino, you’ll need a few key components to bring your project to life. Following is the list of components:
- LCD 16 x 2 Display
- Arduino Uno
- Potentiometer 10kOhms
- Jumper Wires
- Breadboard
- Resistors
Uses of LCD Display 16×2
LCD Display 16×2 is a versatile component that can be used for various purposes with Arduino projects. One common use is to display sensor readings in real-time, making it easy to monitor data at a glance. Additionally, the 16×2 display can show messages or prompts to guide users through interactive systems or projects.
Another practical application of the LCD Display 16×2 is creating digital clocks or countdown timers. Its clear and easily readable interface makes it ideal for displaying time-related information accurately. Moreover, the display can be utilized in creating simple menu interfaces for user interaction in DIY gadgets or appliances.
The LCD Display 16×2 enhances project functionality by providing visual feedback and information output in a compact and user-friendly manner when integrated with Arduino boards.
- To display customs characters and text.
- To display Status, Messages.
- For display readings of sensors.
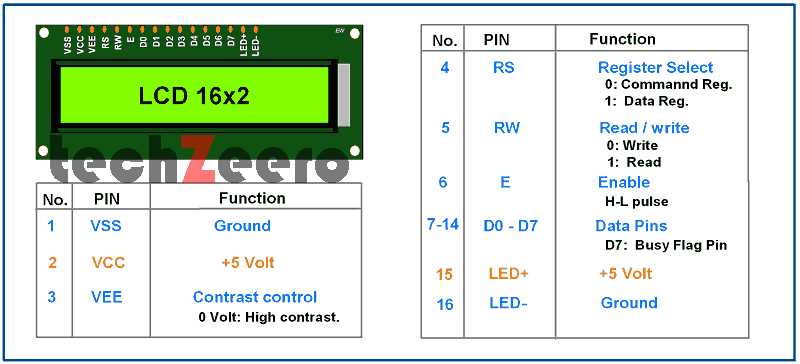
LCD Display 16×2 Pin Description Pinout
LCD Display 16×2 pinout is crucial for connecting the display to an Arduino board seamlessly. The 16 pins on the LCD module serve different functions, allowing for data transmission and control. Understanding each pin’s purpose is essential for a successful project.
Pin 1 (VSS) and Pin 2 (VDD) are power supply pins, providing ground and voltage respectively to operate the display. Pins 3 used for contrast adjustment, enabling optimal visibility of characters on the screen. Pin 4 (RS) selects whether data sent is an instruction or character. Pin 5 (RW) for Read/Write instrustions, Pin 6 (E) is used for enable pulse.
Pins 7 to 14 are data pins through which information is transmitted between Arduino and the LCD module.
While 15 (LED+) pin controls backlight brightness and Pin 16 (LED-) connects to ground.
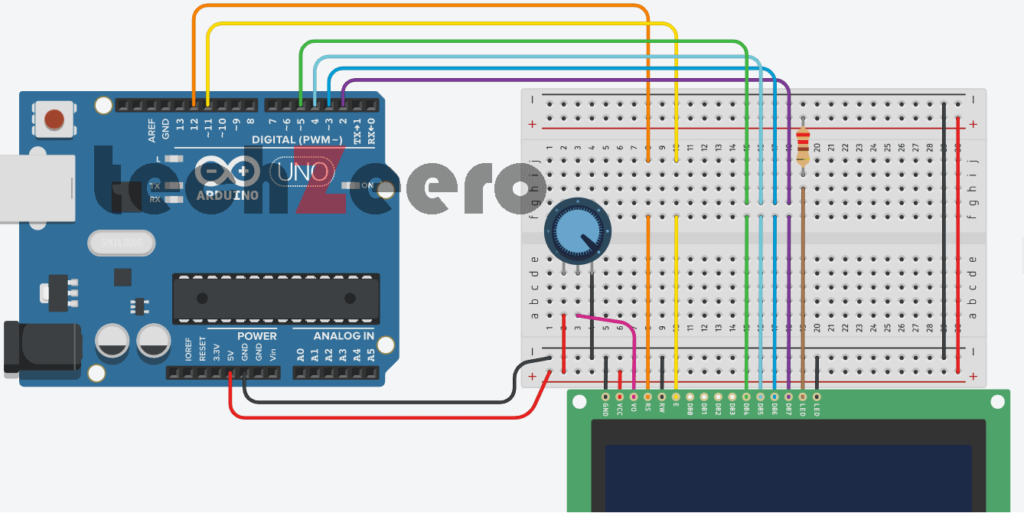
Pin Connections of LCD 16×2 with Arduino
| Pin No. | LCD Pins | Arduino Pins |
|---|---|---|
| 1 | VSS/GND | GND |
| 2 | VDD/VCC | 5v |
| 3 | V0 | Potentiometer Vout |
| 4 | RS | 12 |
| 5 | RW | GND |
| 6 | E | 11 |
| 7-10 | D0-D3 | No connection |
| 11 | D4 | 5 |
| 12 | D5 | 4 |
| 13 | D6 | 3 |
| 14 | D7 | 2 |
| 15 | A/LED+ | 5v |
| 16 | K/LED- | GND |
Circuit Diagram For LCD Display with Arduino
When it comes to setting up an LCD display with Arduino, understanding the circuit diagram is essential. This visual representation shows how to connect the pins of the LCD display to the Arduino board accurately.
To create your circuit, you will need to connect power and ground pins from both the Arduino and the LCD display. Additionally, ensure proper connections for data pins that transmit information between the two components.
Referencing a detailed circuit diagram specific to your LCD display model can help streamline this process. Double-checking connections before powering up your setup is crucial in preventing any potential issues.
LCD displays have more wires connecting to Arduino than most other recipes we discuss. Incorrect connections are the major cause of problems with LCDs, so take your time wiring things properly and triple check the connection.
An inexpensive multimeter capable of measuring voltages and resistance is a big help for verifying that your wiring is correct.
To save a lot of time and head-scratching only we need the cheapest multimeter to check connections and voltage.
We will need to connect a 10K potentiometer to provide the contrast voltage to LCD pin 3. Without the correct voltage on this pin, you may not see anything displayed. In the figure, one side of the pot connects to ground, the other side connects to Arduino +5V, and the center of the pot goes to LCD pin 3. The LCD is powered by connecting ground and +5V of Arduino to LCD pins 1 and 2.
Code for LCD Display 16×2 Arduino
To make the LCD display 16×2 work with Arduino, you need to use code that communicates between the two. The code instructs the Arduino board on what information to send to the display for it to show specific characters or messages.
The coding process involves defining variables, setting up communication protocols, and sending commands to control the display’s behavior. It may seem complex at first, but with practice and understanding of programming basics, you can easily create custom messages or patterns on your LCD screen.
Arduino has a library specifically designed for interfacing with LCD displays like the 16×2 model. This library simplifies the coding process by providing predefined functions that handle tasks such as printing text, positioning cursor, and scrolling content across the screen.
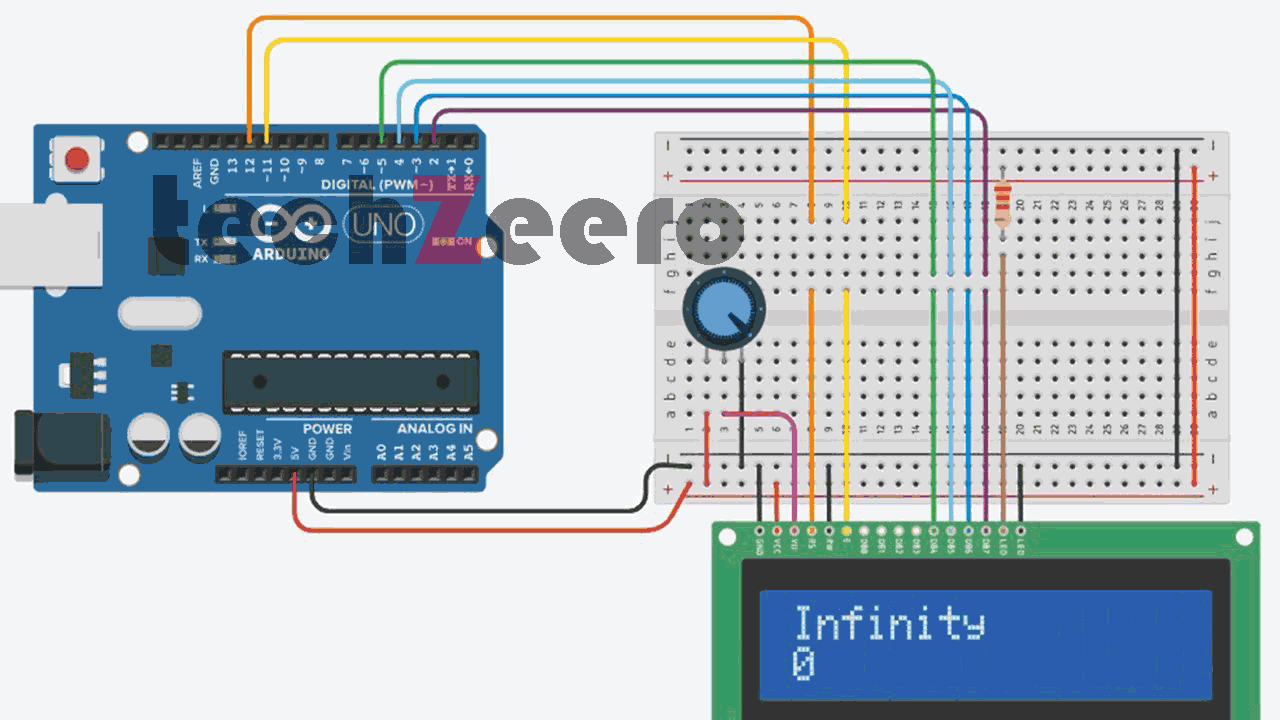
Output
After connecting the LCD display to your Arduino and uploading the code, you’re ready to see some output! The 16×2 LCD screen will come alive with text or characters depending on what you programmed. It’s like watching your project jump from lines of code to a tangible display right in front of you.
Turning the Cursor and Display On or Off
When working with an LCD display and Arduino, you have the flexibility to control the visibility of both the cursor and display. Turning the cursor on allows you to see its position on the screen, which can be useful for certain applications. On the other hand, turning it off can give your project a cleaner look without distractions.
Now we want to blink the cursor and turn the display on or off. We may also draw attention to a specific area of the display.
This sketch shows how you can cause the cursor to blink. It also illustrates how to turn the display on and off; for example, to draw attention by blinking the entire display.
The sketch calls blink and noBlink function to toggle cursor blinking on and off.
To blink the entire display there is a function named displayBlink to flash the display for a specified number of times.
The function uses lcd.display() and lcd.noDisplay() to turn the display text on and off (without clearing it from the screen’s internal memory).
Scrolling Text on LCD 16×2 | Long Text
Have you ever wanted to display long messages or information on your LCD 16×2 screen with an Arduino? Well, scrolling text is the solution! By utilizing this feature, you can showcase lengthy texts that wouldn’t fit on a single line. It adds a dynamic element to your project and enhances user experience.
To implement scrolling text, simply adjust the code to shift the displayed content from right to left or vice versa. This movement creates a visually appealing effect and ensures all information gets attention. Whether it’s displaying updates, notifications, or even fun messages, scrolling text adds versatility to your LCD display setup.
Below code demonstrates both lcd.ScrollDisplayLeft. The marquee function that will scroll text up to 32 characters in length.
The sketch uses the lcd.scrollDisplayLeft function to scroll the display to left when the text is longer than the width of the screen. If we want to scroll the text in right we can use lcd.scrollDisplayRight.
Testing and Troubleshooting
Testing and troubleshooting your LCD display with Arduino is crucial to ensure everything works smoothly. Start by double-checking all connections between the components. A loose wire or incorrect pin connection can easily cause issues.
Next, verify that the code uploaded to the Arduino is correct and matches the hardware setup. One small error in the code can lead to unexpected behavior on the display.
If you encounter problems like garbled text or no display output, try adjusting the contrast potentiometer on the LCD module. Sometimes a simple adjustment can make a big difference in readability.
Additionally, check for any potential power supply issues that may be affecting the performance of your LCD display. Insufficient power could result in erratic behavior or no response at all from the display.
If you’re still facing challenges, consult online forums or resources for troubleshooting tips specific to LCD displays with Arduino. Patience and persistence are key when solving technical issues in electronics projects.
Advanced Features and Applications of LCD Displays with Arduino
LCD displays with Arduino offer a wide range of advanced features and applications that can take your projects to the next level. One such feature is the ability to create custom characters on the display, allowing for personalized icons or symbols. This can be particularly useful in creating user-friendly interfaces or displaying specific information.
Another advanced application is using an I2C backpack module with the LCD display, which simplifies wiring and allows for multiple devices to be connected simultaneously. This opens up possibilities for more complex setups without adding unnecessary complexity.
Additionally, LCD displays can be integrated with sensors to create dynamic data visualization systems. For example, you can connect a temperature sensor to display real-time temperature readings on the screen, providing immediate feedback in various projects like weather stations or smart home automation.
Moreover, utilizing libraries like LiquidCrystal_I2C library can streamline programming tasks and enable smoother communication between Arduino and the LCD display.