Discover the fascinating world of 7 segment display and unlock endless possibilities with Arduino! Join us on a journey to explore the inner workings, coding magic, and exciting applications of this dynamic duo. Get ready to illuminate your projects and bring your ideas to life in a whole new light!
We will be interfacing a 7 Segment Display with Arduino and learn to display digits from one to nine. Also, display a count down on 7 Segment Display.
A 7 segment LED display is a form of an electronic display device is used for displaying decimal numerals. It is an alternative to previously used more complex dot matrix displays.
Mainly used in electronic meters, digital clocks, basic calculators, and other electronic devices that display numerical information.
7 Segment LED Display consists of seven LEDs arranged in a rectangular fashion as shown. When illuminated, each of the seven LEDs identifies itself as a segment because it contributes to displaying a numerical digit (of both Decimal and Hex).
Components List
- 7 Segment Display (Common Cathode)
- Arduino Uno
- Jumper Wires
- 1 x Breadboard
- 7 x 220-ohm resistors
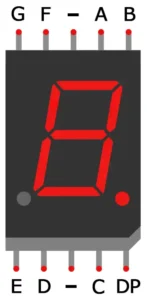
7 Segment Display Pinout
When it comes to understanding the components of a 7 segment display, there are a few key elements to consider. The display consists of seven LED segments arranged in a specific pattern to represent numbers from 0 to 9. Each segment has a label from A through G, with an eighth segment for the decimal point if needed.
One can control these segments individually or together to create different numbers and characters on the display. To operate efficiently, one often uses a current-limiting resistor with each LED segment to regulate the amount of current flowing through them.
Additionally, a common cathode or common anode configuration determines how the LEDs are connected internally. Common cathode displays share a negative connection among all LEDs, while common anode displays have a positive connection shared among them.
Seven Segment Display Working
The seven-segment display consists of seven LED segments arranged in a specific pattern to form numbers from 0 to 9. Each segment can be individually controlled to light up or remain off, allowing for the creation of different numbers and characters.
When connected to an Arduino board, the microcontroller sends signals to each segment based on the desired output. By turning on and off specific combinations of segments, various numbers can be displayed on the screen.
7 segment displays consist of 7 LEDs, called segments, arranged in the shape of an “8”. The 8th segments with a dot on the right side of the digit that serves as a decimal point. Each segment is named with a letter A to G, and DP for the decimal point.
Circuit Diagram for 7 Segment Display with Arduino
When working with a 7 segment display and Arduino, understanding the circuit diagram is crucial. It serves as your roadmap for connecting the components correctly to make everything function smoothly.
The circuit typically involves connecting each segment of the display to specific digital pins on the Arduino board. By following the diagram accurately, you ensure that each LED segment will light up according to your programming instructions.
It’s like putting together a puzzle where every wire and connection plays a vital role in making sure the display communicates information effectively. The simplicity of the circuit layout belies its importance in creating a seamless interaction between hardware and software.
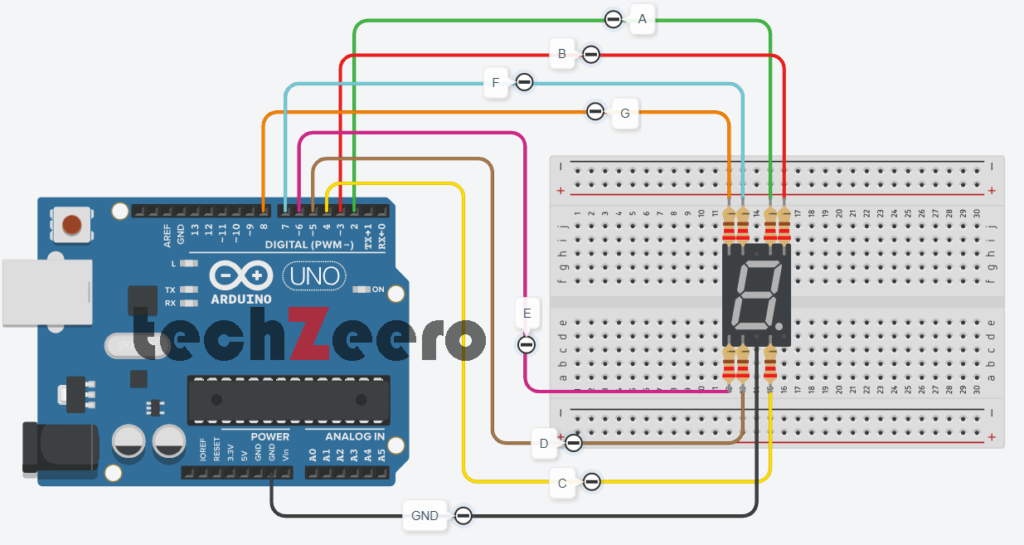
Pin Connection of 7 Segment Display with Arduino
| 7 Segment Pins | Arduino Pins |
|---|---|
| COM1 | GND |
| A | 2 |
| B | 3 |
| C | 4 |
| D | 5 |
| E | 6 |
| F | 7 |
| G | 8 |
| DP | 9 |
Code for turn On-Off 7 Segment LED’s
By utilizing code, we can control each segment of the display to showcase different numbers or patterns.
We need to understand how the Arduino board controls the segment. By sending specific signals to each pin connected to a particular LED segment, we can turn them on or off accordingly.
Writing the code involves specifying which pins correspond to each LED segment and then sending commands to these pins based on the desired output. This allows us to create custom displays like numbers, letters, or symbols.
Output

Code for a Basic Counter Using the Display
Have you ever wanted to create a simple counter using a 7 segment display and Arduino? Well, you’re in luck because it’s easier than you think! By writing a few lines of code, you can make the display count up from 0 to 9 and loop back to 0.
Initialize the pins of Arduino board that are connected to the segments of the display. Then, write a function that will light up each segment based on which number you want to display. You can use this function in your main loop along with some logic to increment the count each time.
Output
Code for Reverse Counting
Now, let’s dive into the fascinating world of reverse counting with a 7 segment display and Arduino. This coding technique adds an element of creativity to your projects by making numbers tick down in sequence.
By implementing a simple algorithm, you can make the digits on the 7 segment display countdown from a specified number to zero. It’s like watching time run backward in a digital format!
The process involves understanding how each segment corresponds to a specific input signal, allowing you to manipulate them effectively for reverse counting. With just a few lines of code, you can create an engaging visual experience that captivates viewers.
Troubleshooting Common Issues with 7 Segment Displays
When working with 7 segment displays and Arduino, troubleshooting common issues can sometimes be a part of the process.
- One frequent problem is incorrect wiring connections. Ensure all wires are properly connected to the correct pins on both the display and the Arduino board.
- Another issue could be related to faulty components. Check for any damaged or burnt out segments on the display, as this can affect its performance. Additionally, confirm that you are using the appropriate resistors to regulate current flow through the LEDs.
- Interference from other electronic devices may also cause disruptions in displaying numbers accurately. Try relocating your setup away from sources of electromagnetic interference like motors or power supplies.
- If numbers are not displaying correctly, double-check your code for any errors that might be causing misinterpretation by the Arduino board. Debugging code is essential in ensuring smooth operation of your 7 segment display project.
Applications and Future Possibilities of Using 7 Segment Displays with Arduino
7 segment displays with Arduino have a wide range of applications beyond simple counting tasks.
- One innovative use is in creating digital clocks that display time in a clear and easy-to-read format.
- 7 segment displays can also be used in temperature monitoring systems, where different segments represent specific temperature ranges.
- In the future, we might see 7 segment displays integrated into smart home automation systems to provide real-time feedback on energy consumption or room temperatures. Imagine having a display panel that shows you exactly how much electricity your appliances are using at any given moment.
- Furthermore, incorporating 7 segment displays into educational tools can make learning electronics and programming more engaging for students. By visualizing data through these displays, complex concepts can be simplified and understood more easily.
The possibilities are endless when it comes to combining 7 segment displays with Arduino technology – from enhancing user interfaces to creating interactive art installations, the potential for creativity and innovation knows no bounds.