Introduction to the Buzzer with Arduino
Are you ready to add a fun and interactive element to your Arduino projects? Look no further than incorporating a buzzer! By interfacing a buzzer with Arduino, you can create sound effects, alarms, melodies, and more.
In this blog post, we will guide you through the process of connecting and programming a buzzer with Arduino. People also refer to a Buzzer as a Piezo Buzzer.
The Arduino can produce sound through an output device like a speaker or Piezo.

How Buzzer works with Arduino
Sound is produced by vibrating air. A sound has a distinctive pitch (frequency) if the vibration repeats regularly. The Arduino can create sound by driving a loudspeaker or piezo device, converting electronic vibrations into speaker pulses which vibrate the air.
The time it takes to pulse the speaker in and out determines the frequency of the sound; shorter durations result in higher frequencies.
We measure frequency in hertz, which indicates how many times the signal completes a repeating cycle in one second. The range of human hearing is from around 20 hertz up to 20,000 hertz (although it varies by person and changes with age).
The Arduino software includes a tune function for producing sound. We are going to see how to use this function to make sound and tunes. The tone function uses hardware timers. On a standard Arduino board, we can produce only one tone at a time.
The sound that can be produced by pulsing a speaker is limited and does not sound very musical. The output is a square wave, which sounds harsh and like an antique computer game than a musical instrument.
It is difficult for Arduino to produce more musically complex sounds without external hardware. We can add a shield that extends Arduino’s capabilities.
Components Needed
- Arduino.
- Piezo Buzzer.
- Resistors.
- LED.
- Jumper Wires.
Playing Tones
We want to produce audio tones through a speaker or other transducer. We want to specify the frequency and duration of the tone.
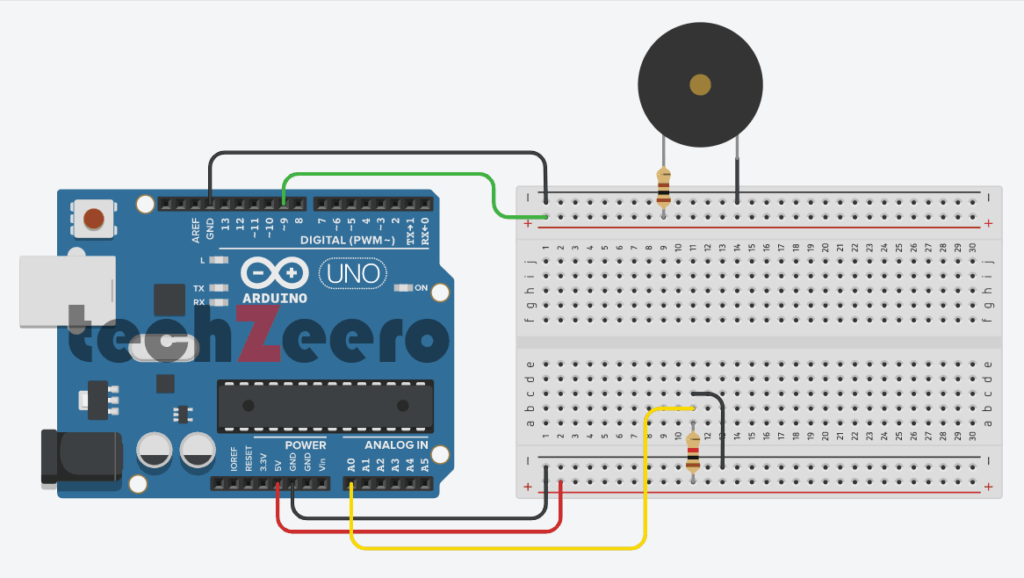
The solution uses the Arduino function. This sketch plays a tone with the frequency set by a variable resistor (or other sensors) connected to analog input 0.
Circuit Diagram for Buzzer with Arduino
In a typical circuit diagram for interfacing a buzzer with Arduino, one terminal of the buzzer connects to a digital pin on the Arduino board, while the other terminal usually links to ground. Additionally, adding a current-limiting resistor in series with the buzzer helps protect it from excessive current.
Code for Buzzer with Arduino
Create a variable to denote the pin where your buzzer is connected. You can then use functions like tone() to generate specific frequencies or noTone() to stop the sound. Experiment with different tones and durations to create unique melodies.
The tone function can take up to three parameters: the pin attached to the speaker, the frequency to play (in hertz), and the length of time (in milliseconds) to play the note.
The third parameter is optional. If omitted, the note will persist until there is a value for audio frequencies in the subsequent line.
int frequency = map(sensorReading, 0, 1023, 100, 5000);Playing a Simple Melody
Imagine programming your Arduino to play “Twinkle, Twinkle Little Star” or the theme from your favorite movie. With just a few lines of code, you can bring these melodies to life through the buzzer attached to your board.
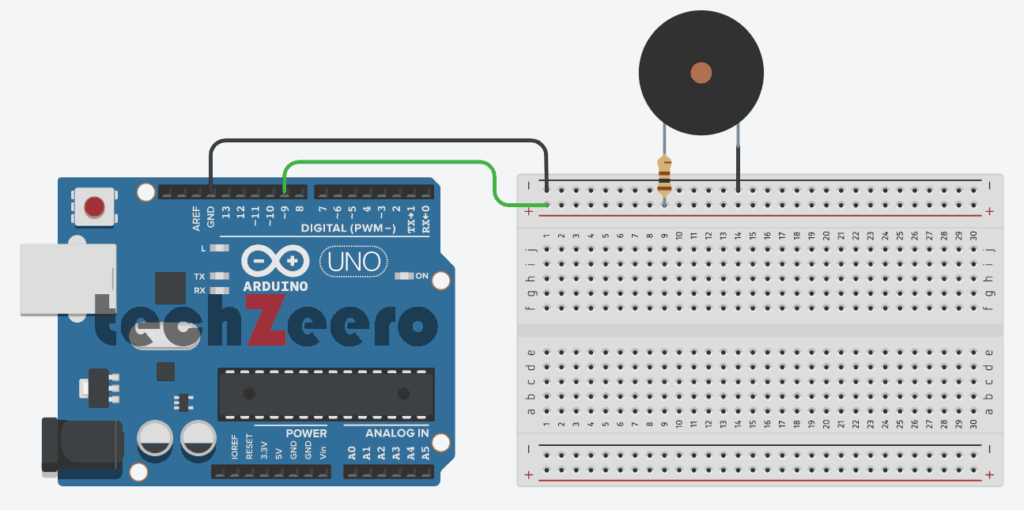
We can use the tone function to play sounds corresponding to notes on a musical instrument. This sketch uses tone to play a string of notes, the “Hello world” of learning the piano, “Twinkle, Twinkle Little Star”.
Circuit Diagram
Code for Simple Melody Buzzer with Arduino
noteNames is an array of characters to identify notes in a score. Each entry in the array corresponds to a frequency defined in the notes array. For example, note C (the first entry in the noteNames array) has a frequency of 262Hz (the first entry in the notes array).
The score is an array of notes representing the note names you want to play:
char score[] = “CCGGaaGFFEEDDC GGFFEEDGGFFEED CCGGaaGFFEEDDC “;Each character in the score that matches a character in the noteNames array will make the note play. The space character functions as a rest, but any character not defined in noteNames will also result in a rest (no note playing).
The sketch calls playNote with each character in the score and duration for the notes of one-third of a second.
The playNote function does a lookup in the noteNames array to find a match and uses the corresponding entry in the frequencies array to get the frequency to sound.
Generating Audio Tones and Fading an LED
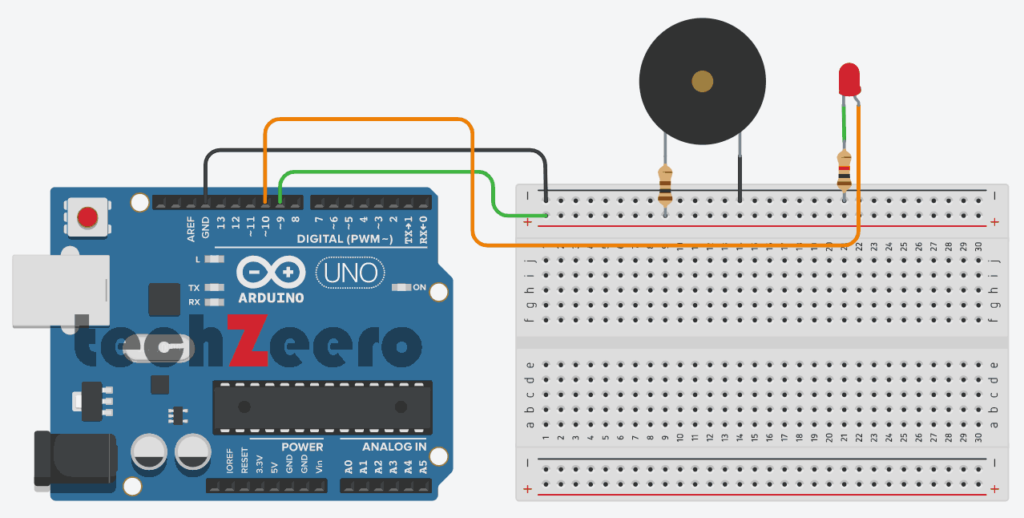
Now, let’s take our buzzer and Arduino project to the next level by exploring how to generate various audio tones and even control an LED’s brightness simultaneously.
We want to produce sounds through a speaker or other audio transducer, and you need to generate the tone in software instead of with a timer; for example, if we need to use analogWrite on pin 9 or 10.
This code does not use a timer, but it will not do anything else while the note is played. Unlike the Arduino tone function, the playTone function described here will block, it will not return until the note has finished.
Circuit Diagram
Code
This sketch generates notes without a timer. It plays six notes, each one twice the frequency of (an octave higher than) the previous one. The playTone function generates a tone for a specified duration on a speaker or piezo device connected to a digital output pin and ground.
Two values are used by playTone: period and duration. The variable represented the time of the one cycle tone to play.
The speaker is pulsed high and then low for the number of microseconds given by period. The for loop repeats the pulsing for the number of milliseconds given in the duration argument.
If we prefer to work in frequency rather than a period, we can use the reciprocal relationship between frequency and period; period is equal to 1 divided by frequency.
We calculate the period value in microseconds because there are 1 million microseconds in one second. The period is determined as 1000000L divided by the frequency. The “L” at the end of that number indicates to the compiler that it should use long integer math to prevent the calculation from exceeding the range of a normal integer.
void playFrequency(int frequency, int duration)
{
  int period = 1000000L / frequency;
  int pulse = period / 2;
}

The rest of the code is the same as playTone:

   for(long i = 0; i < duratoion * 1000L; i+= period)
   {
     digitalWrite(speakerPin, HIGH);
     delayMicroseconds(pulse);
     digitalWrite(speakerPin, LOW);
     delayMicroseconds(pulse);
   }
}
The codes in this recipe stop and waits until a tone has completed before it can do any other processing. It is possible to produce the sound in the background (without waiting for the sound to finish) by putting the sound generation code in an interrupt handler.
Troubleshooting Common Issues
Facing issues while working on projects can be frustrating, but troubleshooting common problems with buzzers and Arduino can help you get back on track smoothly.
- If your buzzer isn’t making any sound, double-check the wiring connections to ensure they are correct and secure. Loose connections can often be the culprit behind silent buzzers.
- In case your buzzer is producing a continuous tone without stopping, review your code for any loops that might be causing the continuous output. Adjusting the code accordingly can help resolve this issue.
- If you’re hearing distorted or unclear sounds from the buzzer, it could indicate a power supply problem. Make sure that your Arduino board is receiving an adequate power supply to function properly.
- Sometimes, using a faulty or damaged buzzer can lead to unexpected results. Consider testing your buzzer separately to confirm if it’s in good working condition before integrating it into your project again.
Fun Project Ideas with Buzzer and Arduino
Looking to take your buzzer and Arduino projects to the next level? Here are some fun ideas to explore:
- Musical Instrument Emulation: Use the buzzer to create sounds resembling a piano, guitar, or even drums. Experiment with different tones and rhythms.
- Simon Says Game: Build a classic Simon game using the buzzer for sound effects when pressing the correct sequence of buttons.
- Alarm System: You can develop an alarm system that triggers the buzzer when sensors connected to your Arduino board detect motion.
- Temperature Alarm: Set up a temperature sensor that activates the buzzer when it detects temperatures above or below certain thresholds.
- Morse Code Translator: Program your Arduino to translate messages into Morse code signals played through the buzzer – a fun way to learn and practice Morse code!
Get creative with these project ideas and have fun exploring the capabilities of combining a buzzer with Arduino!