Introduction to IR Remote Control with Arduino
Welcome to the exciting world of controlling your TV with an Arduino using an IR remote! Imagine being able to sit back and command your entertainment system with just a click of a button. In this blog post, we will delve into the fascinating realm of IR remote controls, how they work, and how you can use them in conjunction with Arduino for endless possibilities.
In this blog, we will learn how to make a TV Remote using an IR and Arduino and control using it.
The Arduino can interact with almost every device which is using some form of remote control, including TVs, audio equipment, cameras, garage doors, appliances, and toys.
Most remote controls work on the principle of sending digital data from a transmitter to a receiver using infrared light (IR) or wireless radio technology.
What is an IR Remote Control?
Have you ever wondered how a simple press of a button can magically control your TV or other electronic devices from across the room? Enter the world of IR remote controls.
An IR (Infrared) remote control is a handheld device that transmits signals to an IR receiver, typically found in electronic appliances like TVs, air conditioners, and more. These signals contain encoded instructions for the receiving device to execute actions such as changing channels, adjusting volume, or turning on/off.
The magic lies in how these remotes communicate wirelessly using infrared light waves invisible to the naked eye. When you press a button on your remote, it emits unique pulses of infrared light, which are then detected by the receiver on the target device.
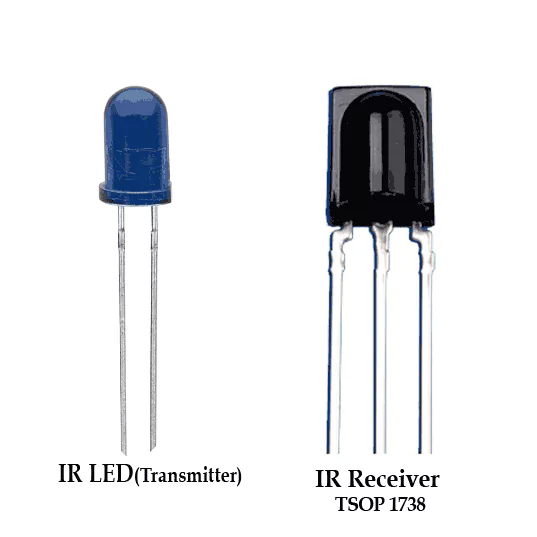
Components Needed
- Arduino Uno.
- IR Receiver (TSOP 1738).
- IR LED (Transmitter).
- Jumper Wires.
IR Transmitter and Receiver
When it comes to controlling devices like TVs or air conditioners with your Arduino, the IR transmitter and receiver play a crucial role in sending and receiving infrared signals. The IR transmitter emits infrared light containing specific codes that represent different functions on your remote control.
On the other hand, the IR receiver on your Arduino board picks up these infrared signals and decodes them into digital information that can be understood by the microcontroller. This allows you to replicate commands from an existing remote control or create custom functionalities for your projects.
By using an IR transmitter and receiver with your Arduino, you open up a world of possibilities for automation and smart technology integration. Whether it’s turning on lights, adjusting temperature settings, or even controlling a robot wirelessly.
Decode Key Codes of Remote
Ever wondered how your TV remote communicates with your television to change channels, adjust volume, or power on/off? It all comes down to the magic of Infrared (IR) technology. IR remotes emit pulses of infrared light that are encoded with specific key codes corresponding to different functions.
When you press a button on your remote, it sends out a unique sequence of IR signals containing the key code for that particular function. These signals are then received by the IR sensor on the device you want to control. The receiver decodes these signals and triggers the appropriate action based on the key code it receives.
We want to detect a specific key pressed on a TV or other remote control.
Code for Decode Remote Key
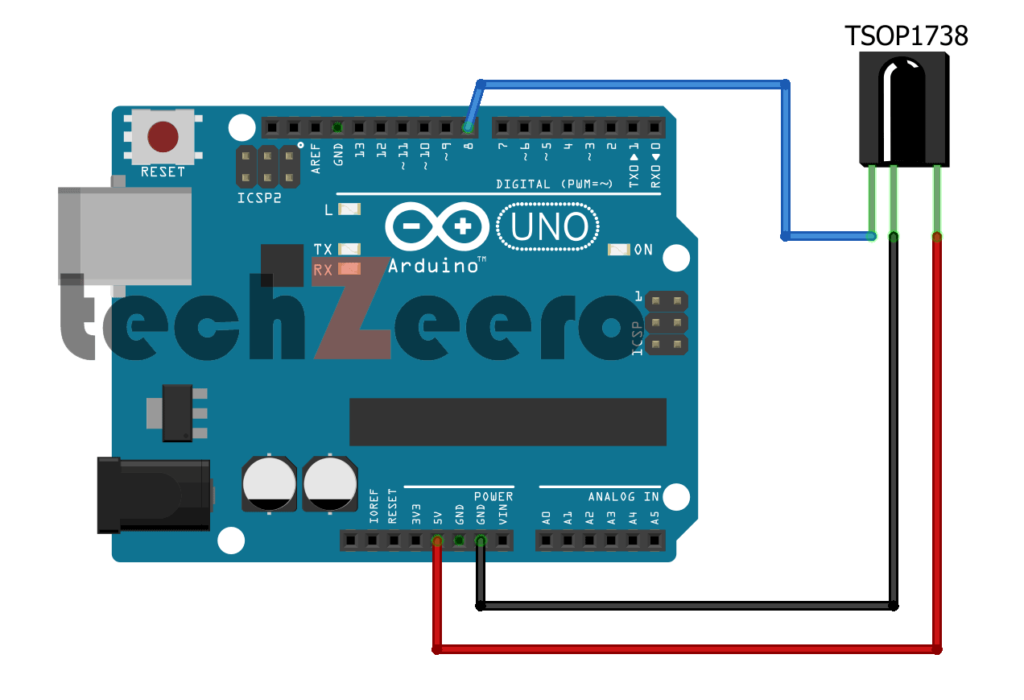
To decode the key codes of a remote, you need to use an IR receiver module connected to your Arduino. This module will receive the signals sent by pressing buttons on the remote.
Once you have captured these signals using the IR receiver, you can utilize libraries like “IRremote.h” in Arduino IDE to decode these signals into specific key codes. These key codes represent each button on the remote control.
We use DEC (Decimal), you can also HEX, etc.
Imitating Remote Control Signals Through Arduino
With Arduino, decoding and replicating remote control signals becomes a breeze. You can analyze key codes from any standard remote and program your Arduino to mimic those commands effortlessly. Whether it’s controlling your TV, air conditioner, or even lights – the possibilities are endless.
By utilizing an IR transmitter and receiver with your Arduino setup, you can seamlessly send out precise signals to operate various devices.
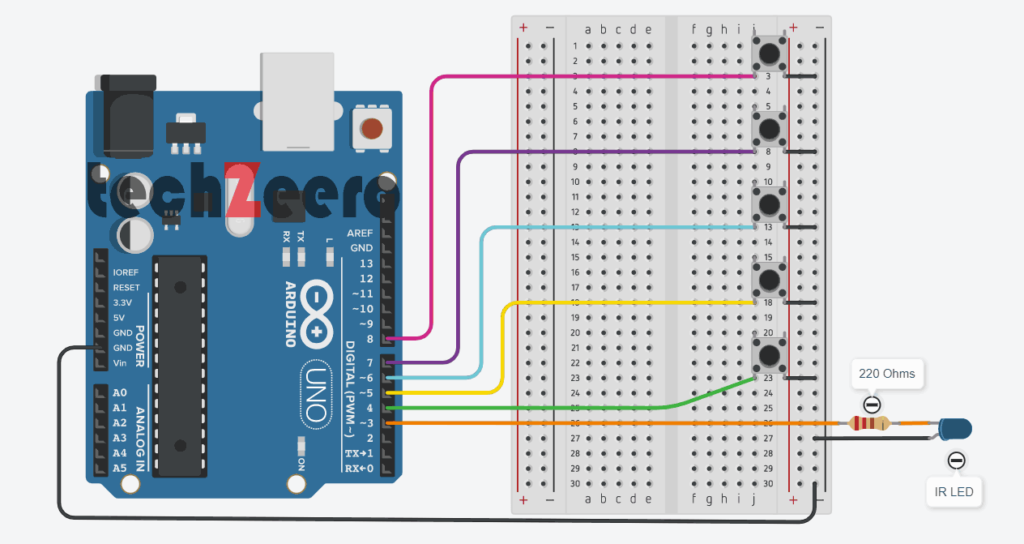
Select five buttons and send one of five codes. Connect an infrared LED to send the signal as shown in the figure.
Code for Sending Signals from Arduino IR Remote
Once you’ve successfully decoded the key codes from your IR remote, the next step is to send signals using your Arduino. This allows you to control devices like TVs, air conditioners, and more with just a few lines of code.
To send signals from your Arduino remote, you’ll need to use an IR transmitter module. This component emits infrared light pulses that mimic the signals sent by a standard remote control.
By utilizing the IRremote library in Arduino IDE, you can easily program your board to transmit specific key codes when triggered by a button press or any other input method.
The below sketch uses the remote control codes to control devices.
Here, the device is controlled by Arduino, which flashes an IR LED to replicate the signal that would be sent from your remote control. This requires an IR LED.
The IR library handles the translation from numeric code to IR LED flashes. We need to create an object for sending IR messages. The following line creates an IRsend object that will control the LED on pin 3.
The code uses an array called irKeyCodes to hold the range of values that can be sent. It monitors five switches to see which one has been pressed and sends the relevant code in the following line:
irsend.sendSony(irKeyCodes[keyNumber], 32);The irSend object has different functions for various popular infrared code formats, so check the library documents if you are using one of the other remote control formats.
The sketch passes the code from the array, and the number after it tells the function how many bits long that number is. The sketch means the codes are written in DEC.
Troubleshooting common issues
When working with an IR remote control and Arduino, it’s common to encounter a few hiccups along the way.
- One of the most frequent issues is improper connections between the IR receiver and Arduino board. Double-check your wiring to ensure everything is properly connected.
- Another common problem could be interference from other electronic devices in the vicinity. Try moving away from potential sources of interference, such as fluorescent lights or wireless routers.
- If the Arduino isn’t recognizing your IR remote control commands, ensure that you have accurately programmed the key codes for each button. A simple error in coding can lead to functionality issues.
- In some cases, using low-quality components may also cause inconsistencies in signal transmission. Consider upgrading to higher-quality IR receivers and transmitters for better performance.
Creative Projects using an IR Remote Control and Arduino
Looking to take your Arduino skills to the next level? How about incorporating an IR remote control into your creative projects for added convenience and functionality? The possibilities are endless when it comes to combining the power of Arduino with an IR remote.
- One fun project idea is creating a smart home automation system where you can control lights, appliances, and even curtains with just a press of a button on your IR remote. Imagine walking into a room and using your remote to adjust the lighting or turn on your favorite music playlist – all thanks to Arduino!
- For the tech-savvy DIY enthusiasts, why not build a custom-designed robotic arm that responds to commands from an IR remote? This project will not only test your programming skills but also showcase the precise control capabilities of Arduino in action.
- Or how about designing a personalized home entertainment setup where you can use the IR remote to switch between different audio/video sources seamlessly? With Arduino at the helm, you can create a user-friendly interface that caters to all your entertainment needs effortlessly.