Introduction to IR Receiver and Remote
Welcome to the exciting world of IR sensor and Arduino! Have you ever wanted to control devices with just a remote? Well, today we’re diving into the realm of infrared technology and how you can harness its power using an IR receiver and remote with Arduino. Get ready to unlock a whole new level of automation and control as we explore the possibilities together. Let’s dive in!
In this tutorial, we will learn how to use an IR Receiver and Remote with Arduino.
Infrared (IR) communication is widely used and wireless technology which is easy to implement. We will use the TSOP1738 IR receiver for receiving data from the remote. Mainly, TSOP Receiver is used to receive data which support various transmitted code.
In this tutorial, we will cover –
- Decoding the remote keys.
- Control lights using the IR Receiver and Remote.
Component List
- Arduino UNO.
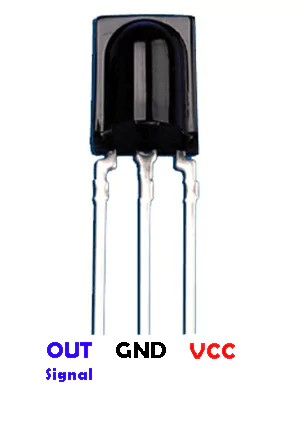
- TSOP1738 IR Receiver.
- Jumper Wires.
- Breadboard.
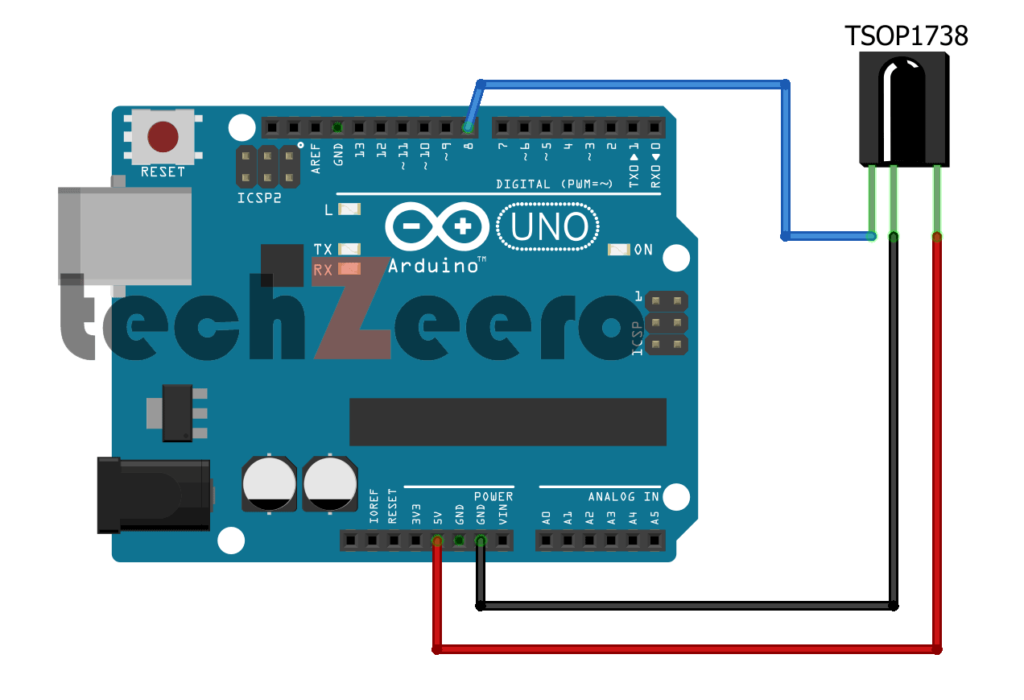
Circuit Diagram For IR Receiver and Remote with Arduino
Setting up the circuit diagram for an IR sensor with Arduino is crucial for a successful project. To begin, gather your components – an IR receiver module, Arduino board, breadboard, resistors, and jumper wires.
Connect the VCC pin of the IR sensor to 5V on the Arduino board; attach GND to ground; link signal pin to digital pin 8 on Arduino using a resistor. Ensure all connections are secure and follow the schematic closely.
Code For Decoding The Remote Keys
When working with an IR receiver and remote in Arduino projects, decoding the remote keys is essential for communication between the devices. By capturing the signals sent from the remote, we can interpret which buttons are being pressed to trigger specific actions.
To decode the remote keys, we utilize a library that helps us translate the raw data received by the IR sensor into meaningful commands. This process involves analyzing patterns in the signal to map each button on the remote to a unique code.
With this information decoded, we can then assign functions or behaviors to different key presses. Whether it’s controlling LEDs, motors, or other components connected to your Arduino board, understanding how to decode and use these key codes opens up a world of possibilities for your projects.
IR Sensor Arduino Library
With the IR Sensor Arduino Library, you can easily decode signals from various remote controls or other infrared devices. This means you don’t have to start from scratch every time you want to integrate an IR sensor into your project.
You need to install the IR library. Now go to Sketch > Include Library > Manage Libraries and search for IRRemote by shirriff.
OR just download from https://github.com/Arduino-IRremote/Arduino-IRremote and Add .Zip Library.
Upload below code for decoding the remote keys code. Press the remote keys in front of the IR receiver and get the key code in the serial monitor of IDE.
Code For Controlling LED using IR Sensor and Remote
Controlling an LED using an IR receiver and remote with Arduino opens up a world of possibilities for creating interactive projects.
The code required for this functionality involves decoding the signals received from the remote to trigger specific actions. By mapping different remote keys to control the LED, you can customize your project based on your preferences.
The Arduino sketch will include functions to capture and interpret the incoming IR signals, allowing you to assign specific commands for turning the LED on or off, changing brightness levels, or even triggering effects.
Now we will control a led using the IR Receiver and Remote. Connect a led on Arduino pin 13. You can easily modify the code for controlling servo motor or relays.
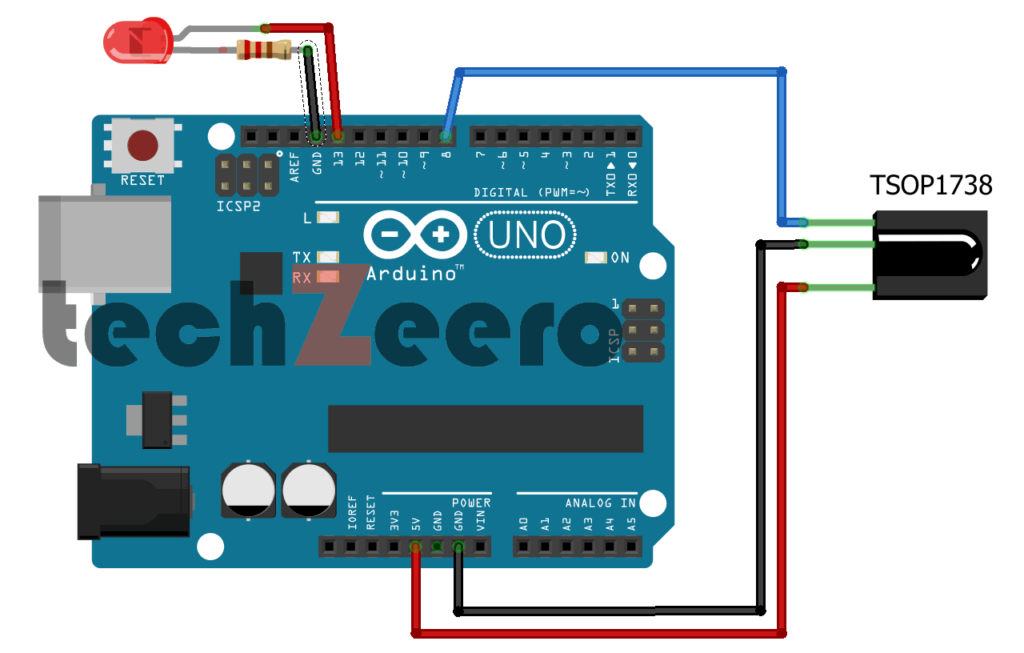
Now press the remote key to turn on the led. When you press the key repeatedly it changes the light state of led.
Testing and Troubleshooting
Once you have set up your IR receiver and remote project with Arduino, it’s essential to conduct thorough testing to ensure everything works as expected.
- Start by pointing the remote towards the IR sensor and pressing different buttons to verify that it accurately receives the signals.
- If you encounter any issues during testing, double-check all connections in your circuit. Make sure there are no loose wires or incorrect placements that could be causing interference.
- Another way to troubleshoot is by verifying the code for decoding the remote keys. Ensure that the code matches the signals being received from the remote control.
Applications and uses of IR receiver and remote with Arduino
The applications of IR receivers and remotes with Arduino are vast and diverse.
- One common use is in home automation systems, where you can control devices like lights, fans, or air conditioners wirelessly using an IR remote.
- This technology also finds its place in robotics for creating autonomous robots that can be controlled remotely.
- Another interesting application is in the field of security systems. By integrating IR receivers with Arduino, you can develop motion detector alarms or access control systems to enhance the security of your home or workplace.
- Moreover, IR receivers are utilized in entertainment systems for controlling TVs, audio equipment, and even drones.