Introduction to PIR Sensor and Arduino
In this blog post, we will dive into the exciting world of PIR sensor paired with Arduino. Get ready to explore how these two innovative technologies can work together seamlessly to bring your ideas to life.
Let’s unleash the potential of PIR sensor with Arduino and discover the endless possibilities they offer in creating interactive and responsive projects.
A passive infrared sensor (PIR) is an electronic sensor which is used to detect motion.
When a person in the field of the sensor moves, it detects a sudden change in infrared energy and the sensor is triggered (activated). It acts as a switch.
They don’t detect or measure Heat, but they detect infrared radiation emitted from objects.
These sensors commonly used in security, lighting, and alarm systems.
The range of PIR sensors is approximately 6 meters, depending on conditions.
When PIR detects the motion of any object the output voltage is high because of its sense infrared radiation whereas it is low when there is no motion.
Components Needed
- Arduino UNO.
- PIR Sensor.
- Jumper Wires.
Circuit Diagram For PIR Motion Sensor with Arduino
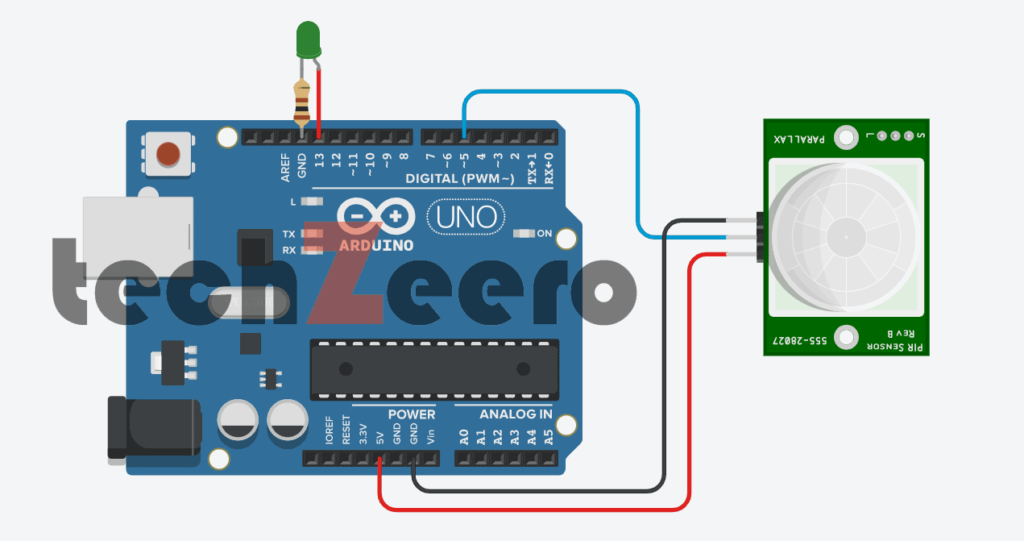
When setting up a PIR motion sensor with Arduino, understanding the circuit diagram is crucial. The diagram illustrates how the components connect to each other, guiding you through the wiring process.
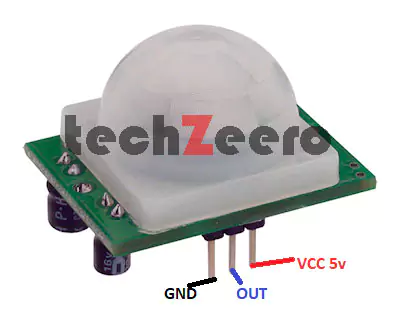
Typically, the PIR sensor has three pins for power supply, ground, and signal output which need to be connected to specific pins on the Arduino board. Additionally, resistors may be required to adjust voltage levels or protect components.
Pin Connections of PIR with Arduino
| Arduino UNO | PIR Sensor |
|---|---|
| 5v | Vcc |
| GND | GND |
| D5 | Out |
Code for PIR Sensor with Arduino
We will need to write a simple code that reads the digital signal output from the PIR sensor. This code will typically involve setting up a pin for input, reading the state of that pin, and then triggering an action based on whether motion is detected or not.
Next, you can add more complexity to your code by incorporating additional functions like controlling an LED or buzzer when motion is detected. This allows you to create interactive projects that respond in real-time to movement in their environment.
Code 2
Output
Once the PIR sensor detects motion, it sends a signal to the Arduino board. The Arduino then processes this information and triggers an output based on the programmed instructions. This output can be in various forms, such as turning on a light, activating an alarm, or sending a notification.
Testing and troubleshooting
Testing the PIR sensor with Arduino is crucial to ensure proper functionality. Once the circuit is set up, initiate testing by moving in front of the sensor to check if it detects motion accurately. If there are any issues, first double-check all connections and components to rule out any loose wiring or faulty parts.
One common troubleshooting technique is adjusting the sensitivity and time settings on the PIR sensor module. Depending on your project requirements, fine-tuning these parameters can improve detection accuracy. Additionally, make sure there are no obstructions blocking the sensor’s view that could interfere with its performance.
If problems persist, reviewing the code for any errors or inconsistencies may be necessary. Debugging tools like serial monitoring can help identify issues in real-time. Remember to refer back to the datasheets of both the PIR sensor and Arduino board for specific troubleshooting guidance tailored to your setup.
Uses Of PIR Sensor
- Automatic Doors which open and close on Motion Detection.
- All Outdoor Lights.
- Lift Lobby.
- Motion Cameras.
- Lights on/off by Motion Detection.
- Basement Parking Areas.
- Escalator Lights(Staircase).
- Security Alarm based on Motion Detection.
Creative applications of PIR sensor with Arduino
Imagine turning on your room lights automatically as soon as you walk in, creating a seamless hands-free experience. With a PIR sensor and Arduino, this dream can become a reality!
You can also build a smart security system for your home or office using PIR sensors with Arduino. Receive real-time alerts on your phone whenever motion is detected in restricted areas.
Get creative by integrating PIR sensors with Arduino into interactive art installations or escape room puzzles. The possibilities are endless – trigger sound effects, change lighting colors, or even unlock hidden compartments based on movement.
Outdoor enthusiasts can use this setup to monitor wildlife activity in their backyard or capture stunning photos of nocturnal creatures without disturbing them.