Introduction to Arduino Real Time Clock
Ready to take your Arduino projects to the next level? Say goodbye to manual timekeeping and hello to precision with an Arduino Real Time Clock. Imagine having your creations run on their own schedule, keeping track of time accurately without needing a dedicated RTC module.
In this blog post, we’ll show you how to create an Arduino Real Time Clock without using an RTC module, opening up a world of possibilities for your innovative projects. We use a time library to display live time.
We want to use the time of day (hours, minutes, and seconds) in a sketch, and we don’t want to connect external hardware.
Advantages of Using an Arduino Real Time Clock Without RTC Module
Having an Arduino Real Time Clock (RTC) without the need for a separate RTC module comes with several advantages. One major benefit is cost-efficiency, as you can save money by utilizing the built-in clock feature of the Arduino board itself. This eliminates the need to purchase an additional component, making it a budget-friendly option for timekeeping projects.
Another advantage is space-saving. By integrating the real-time clock function directly into your Arduino project, you free up physical space on your breadboard or PCB that would have been occupied by a separate RTC module. This streamlined design can be especially beneficial for compact or portable projects where every millimeter counts.
Furthermore, using an Arduino Real Time Clock without an external RTC module simplifies the wiring and setup process. With fewer components to connect and configure, you can reduce potential points of failure and make troubleshooting easier if issues arise during development or operation.
Must See
Code for Arduino Real Time Clock
Now, let’s dive into the exciting part – the code for your Arduino Real Time Clock!
The below sketch uses the time library to display the time of day.
Download Arduino Time Library :
The time library enables us to keep track of the date and time. A standard Arduino board quartz for timing and this is accurate to a couple of seconds per day, but it does not have a battery to remember the time when power is switched off. Therefore, time will restart from 0 each time a sketch starts, so you need to set the time using the setTime function. The sketch sets the time to noon on January 1 each time it starts.
Of course, it’s more useful to set the time to your current local time instead of a fixed value. The following sketch gets the numerical time value (the number of elapsed seconds since January 1, 1970) from the serial port to set the time. You can enter a value using the Serial Monitor.
We can also display the time on an LCD 16×2 Display. So this is your homework to show the time on an LCD.
Take Reference:- LCD 16×2 Display with Arduino.
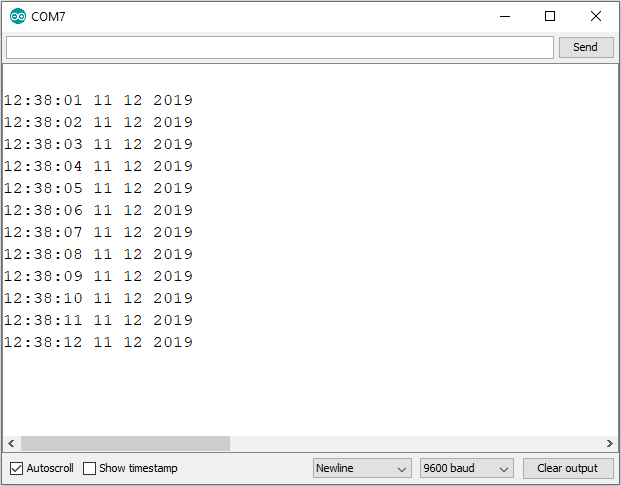
Output
Once you have successfully built your Arduino Real Time Clock without an RTC module and uploaded the code, it’s time to see the magic happen. The output of your project will be at Serial Monitor showing the current time accurately ticking away.
As you power up your Arduino, watch as the clock begins its journey by displaying hours, minutes, and seconds in real-time. Witness how precise timing is achieved without needing an external RTC module.
Open the Serial Monitor to view the output.
Creating an Alarm to Periodically Call a Function
Imagine being able to customize your Arduino Real Time Clock to not only keep track of time but also trigger specific actions at set intervals. By creating an alarm system within your code, you can have the Arduino call a function periodically.
We want to perform some action on specific days and at specific times of the day.
TimeAlarms is a companion library included in the Time Library download (installing the Time library will also install the TimeAlarms library).
You can schedule tasks to trigger at a particular time of day, known as alarms, or schedule tasks to occur after a specified interval of time has elapsed, referred to as timers. Each task can be configured to repeat continuously or to occur only once.
To utilize the TimeAlarm library, you need to have the Time library installed. No internal or external hardware is necessary for using the TimeAlarms library. The scheduler does not use interrupts, so the task-handling function is the same as any other function you create in your sketch.
Alternative Methods for Timekeeping with Arduino
Looking for alternative methods to keep time with your Arduino besides using a Real Time Clock module?
- One option is utilizing the internal millis() function. This function counts the number of milliseconds since the board powered up, allowing you to track time intervals accurately.
- Another method involves syncing your Arduino with an external source like a GPS module. By connecting your board to GPS satellites, you can retrieve precise time and date information, ensuring accurate timekeeping even without an RTC module.
- You could also consider incorporating internet-based time synchronization protocols such as NTP (Network Time Protocol). With this approach, your Arduino can connect to NTP servers over Wi-Fi or Ethernet to fetch the current time online.