Introduction to DS3231 Real-Time Clock (RTC)
In this blog post, we will explore how you can easily integrate the DS3231 RTC module with Arduino and get time.
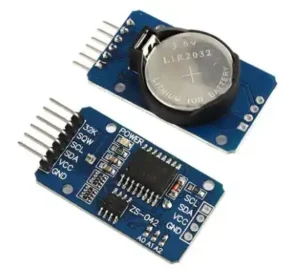
The DS3231 RTC Module (Real-Time Clock Module) is employed to track the current time and date, commonly used in computers, laptops, mobiles, embedded system applications, and other devices.
We want to use the time of day provided by a real-time clock (RTC). These boards have a battery backup, ensuring that the time remains correct even when the Arduino is reset or turned off. Also, it has automatic compensation for leap-years and for months with fewer than 31 days. The module can work on both 5v and 3.3v.
Benefits of Using an RTC for Timekeeping
Are you tired of constantly setting the time on your projects or devices? Enter the DS3231 Real-Time Clock (RTC) – a game-changer in timekeeping precision. With an RTC, you can bid farewell to manual adjustments and ensure accurate timing for your Arduino projects.
One key benefit of using an RTC is its ability to maintain correct time even when your Arduino is powered off. This means no more need to reset the clock every time you turn your project on!
Additionally, the DS3231 RTC boasts impressive accuracy, with minimal drift over extended periods. Say goodbye to inaccurate timestamps and hello to precise scheduling for all your applications.
Must See
Components Needed
- Arduino.
- DS3231 RTC Module.
- LCD 16×2 Display.
- Jumper Wires.
- Breadboard.
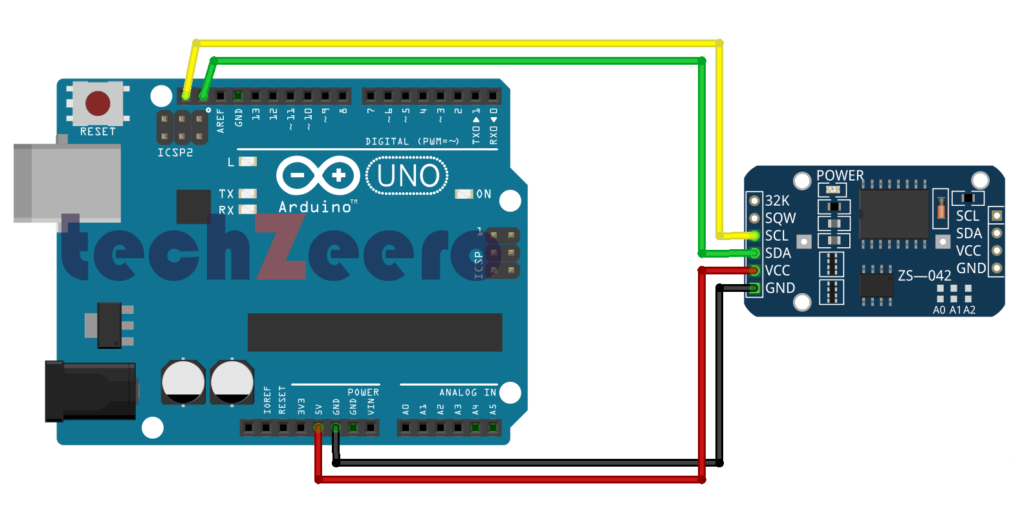
Circuit Diagram for DS3231 RTC with Arduino
To set up the circuit, you’ll need to connect SDA and SCL pins from the DS3231 module to SDA and SCL pins on your Arduino board respectively which are above AREF pin. Additionally, ensure that VCC and GND are properly connected to power up the RTC module.
Code for RTC with Arduino
The code for interfacing the DS3231 Real-Time Clock (RTC) module with Arduino is surprisingly straightforward. By using libraries like Wire.h and DS3231.h, you can easily set up communication between the two devices. Start by including these libraries in your sketch to access functions that simplify working with the RTC module.
Initialize the DS3231 object in your code and use its functions to read the current time, date, or even set alarms if needed. With just a few lines of code, you can configure the RTC module to keep accurate time and trigger specific actions at predetermined moments.
Download DS3231 RTC Arduino Library
We are using the Library which is made by Henning Karlsen. You can also download it from his website, www.rinkydinkelectronics.com.
Upload the code and open the serial monitor to view the result.
RTC Module and LCD 16×2 with Arduino
By connecting the RTC module and LCD 16×2 display to your Arduino board, you can easily showcase information like the current time, date, or any other sensor data in a clear and organized manner.
The combination of these modules offers both functionality and readability, making it ideal for various applications such as digital clocks, weather stations, or even countdown timers.
LCD Reference:- Interfacing LCD 16×2 Display with Arduino.
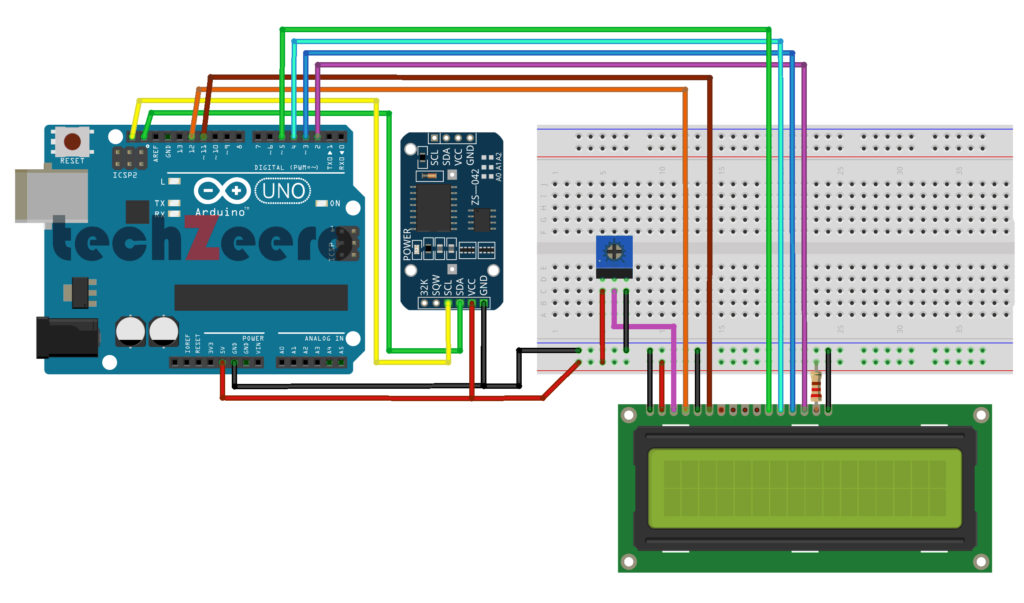
Circuit Diagram for RTC and LCD 16×2
When connecting the DS3231 RTC module with an LCD 16×2 display to your Arduino, it’s essential to have a clear circuit diagram to ensure proper functionality.
To start, connect the SCL pin of the RTC module to SCL on the Arduino and the SDA pin to SDA. Next, link VCC and GND from both modules appropriately. For the LCD screen, connect RS, E, D4-D7 pins respectively to digital pins on your Arduino board.
Remember to include a potentiometer for adjusting contrast and backlighting of the LCD display. Double-check all connections before powering up your circuit.
With this setup in place, you’ll be able to not only keep accurate time using the RTC module but also display it conveniently on the LCD screen.
Code for RTC and LCD 16×2
The code allows you to display real-time data from the RTC on the LCD screen, creating a functional and informative project.
To start, you’ll need to include the necessary libraries for both the RTC module and the LCD display in your Arduino sketch. This sets up communication between the components and ensures they work together seamlessly.
Next, initialize both the RTC module and the LCD display in your setup function. This step prepares them for operation once your code starts running.
Within your loop function, you retrieve time data from the RTC module and send it to be displayed on the LCD screen. This continuous loop ensures that updated time information is always shown on the display in real-time.
Troubleshooting Common Issues
Facing issues with your DS3231 RTC module when working with Arduino can be frustrating but fear not, as we dive into some common troubleshooting tips to help you get back on track.
- If you’re experiencing incorrect time readings, double-check the connections between the DS3231 and Arduino. Loose or faulty wiring can lead to inaccurate data transmission.
- In case your RTC module is not responding at all, ensure that the device is receiving power correctly. Verify the voltage requirements and check if there are any loose connections causing disruptions in power supply.
- Another common issue could be related to software conflicts. Make sure that your code for interfacing with the DS3231 is correct and no conflicting libraries are causing errors in communication.
Practical Applications of RTC Module with Arduino
Looking to add some timekeeping functionality to your projects? The DS3231 RTC module with Arduino opens up a world of practical applications.
- One popular use is in data logging systems where accurate timestamping is crucial for analyzing trends over time.
- For those interested in home automation, integrating the RTC module allows you to schedule tasks like turning on lights at specific times or regulating temperatures based on the time of day.
- In the realm of robotics, real-time clock modules are essential for coordinating precise movements and actions at predetermined intervals. This can be particularly useful for autonomous robots that need to follow a set schedule.
- Additionally, by combining the RTC module with sensors, you can create alarm systems that trigger alerts based on specific timing conditions or environmental changes.