Introduction to Delay and Millis Function
Are you an Arduino enthusiast looking to level up your skills and understanding of delay() and millis() functions? In this blog post, we will learn how to use delay() and millis() function in Arduino programs.
The delay() function, although commonly used to pause the program for a specified time, can cause delays in other operations, rendering the system unresponsive.
On the other hand, millis() function tracks the elapsed time since the program started running, allowing for multitasking without blocking code execution.
By utilizing millis() instead of delay(), you can create programs that respond to inputs promptly while performing multiple tasks simultaneously. This ensures smoother operation and enhances overall performance of your Arduino projects. Understanding how these functions work together enables you to write more effective code that maximizes efficiency.
Must See
How to Use Delay Function in Arduino
The delay function allows you to pause the program for a specific amount of time, which can be useful for creating delays between actions or controlling the speed of processes.
To use the delay function, simply specify the desired duration in milliseconds within the parentheses of the function. For example, if you want to pause the program for 1 second, you would write “delay(1000);” where 1000 milliseconds equals 1 second.
We want our sketch to pause for some period of time. This may be some number of milliseconds or time given in seconds, minutes, hours, or days.
The Arduino delay function is used in many sketches, as we have seen. delay pauses a sketch for the number of milliseconds specified as a parameter. The sketch that shows how we can use the delay to get almost any interval.
The delay function has a range from one one-thousandth of a second to around 25 days (just less than 50 days if using an unsigned long variable type).
The delay function pauses the execution of your sketch for the duration of the delay. You can use delayMicroseconds to delay short periods.
There are 1,000 microseconds in one millisecond, and 1 million microseconds in one second. delayMicroseconds will pause from one microsecond to around 16 milliseconds, but for delays longer than a few thousand microseconds you should use delay instead: delayMicroseconds(10); //delay for a 10 microseconds
delay and delayMicroseconds will delay for at least the amount of time given as the parameter, but they could delay a little longer if interrupts occur within the delay time.
Using millis() to Determine Duration
One powerful aspect of using the millis function in Arduino is its ability to determine duration accurately. By utilizing millis, you can track the time elapsed since a specific event occurred, making it ideal for timing applications such as controlling LEDs, motors, or sensors.
The millis function counts the number of milliseconds that have passed since powering on the Arduino board. This allows you to have precise control over when actions should take place based on defined time intervals.
We want to determine the elapsed time since an event occurred, such as how long a switch has been held down.
The millis function returns the number of milliseconds since the current sketch started running. This number will overflow (go back to zero) in approximately 50days.
By storing the start time for an event, you can determine the duration of the event by subtracting the start time from the current time, as shown here:
Long duration = millis() – startTime;In this example, we customize the functionality for your application, flashing an LED five times per second while delaying the print statement in the loop for four-second intervals.
** Connect a LED on Pin 13
You can put code in the myDelay function for an action that you want to happen repeatedly while the function waits for the specified time to elapse.
Measuring the Duration of Pulse
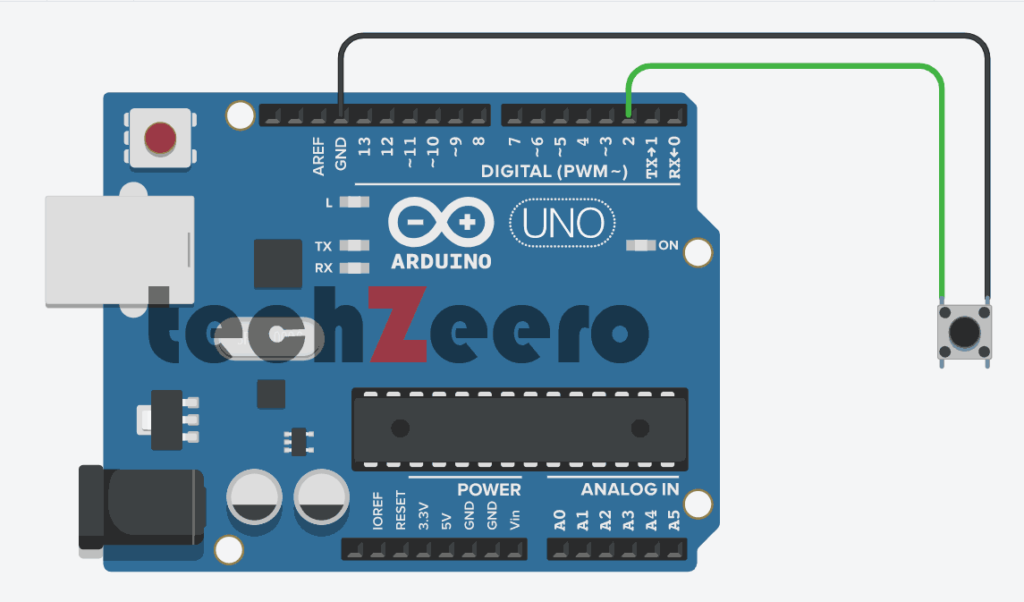
We want to determine the duration of a pulse with microsecond accuracy; for example, to measure the exact time between two button presses.
The pulseIn function returns the duration in microseconds for a changing signal on a digital pin. This sketch prints the time that the voltage on a digital pin is held LOW by a button press.
pulseIn can measure how long a pulse is either HIGH or LOW:
pulseIn(pin, HIGH); //return microseconds that pulse is HIGH
pulseIn(pin, LOW); //returns microseconds that pulse is LOW
the pulseIn function waits for the pulse to start (or for a timeout if there is no pulse). By default, it will stop waiting after one second, but you can change that by specifying the time to wait in microseconds as a third parameter (note that 1,000 microseconds equal 1 millisecond):
pulseIn(pin, HIGH, 5000); //wait 5 milliseconds for the pulse to startpulseIn can measure values between around 10 microseconds to three minutes in duration, but the value of long pulses may not be very accurate.
The timeout value only matters if the pulse does not start within the given period. Once the start of a pulse is detected, the function will start timing and will not return until the pulse ends.
Troubleshooting Common Issues
Encountering issues while working with Delay and Millis functions is common, but understanding how to troubleshoot them can make a significant difference in your Arduino projects.
- One common problem is mistakenly using delay() when you should be utilizing millis(), causing delays in other parts of your code.
- Another issue may arise if your code becomes too complex, resulting in timing errors or unexpected behavior. Simplifying the logic and breaking down tasks into smaller functions can help alleviate this issue.
- Additionally, running out of available memory on your Arduino board due to excessive use of delays can lead to malfunctions. Consider optimizing your code by reducing the dependency on delay() where possible.
Examples of Projects Using Delay and Millis Functions
Have you ever wondered how Delay and Millis functions in Arduino can be applied to real-life projects? Let’s explore some creative examples together!
- Imagine a simple LED blinking project where the delay function is used to control the intervals between each blink. By adjusting the delay time, you can create different patterns and effects.
- In more advanced applications, like robotics or automation systems, millis function plays a crucial role. It allows for precise timing without blocking other operations in the code, ensuring smooth functionality.
- Another exciting example is creating a timer or stopwatch using millis function. You can accurately measure time durations for various purposes such as sports training or cooking.