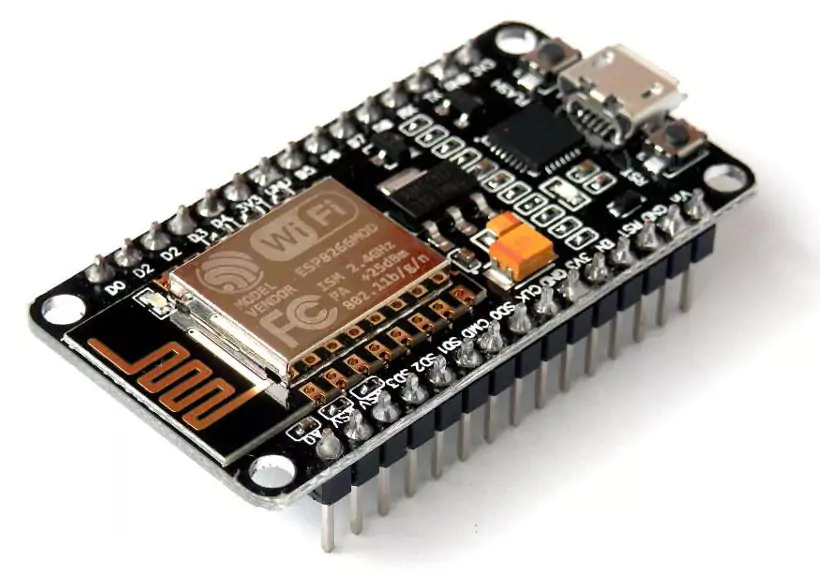
NodeMCU is not your average microcontroller board; it’s a game-changer in the world of DIY electronics. Developed based on the ESP8266 WiFi module, NodeMCU combines the power of an Arduino-compatible board with built-in WiFi connectivity.
It runs on the ESP8266 Wi-Fi Soc from Espressif Systems, and hardware which is based on the ESP-12 module. Lua scripting language is used by the firmware.
It is built on the Espressif Non-OS SDK for ESP8266 and it is based on the eLua project.
You can program the device using the Arduino IDE or ESP8266 SDK.
It is a development board for ESP8266, which is a wifi chip with a 32bit microcontroller.
The ESP8266 is produced by Shanghai-based Chinese manufacturer, Espressif Systems and it is a low-cost Wi-Fi microchip with full TCP/IP stack and microcontroller capability.
This device has 9 digital pins out of 17 GPIO pins. It has only 1 analog pin.
It has 3V output pins, a 5V output pin is not available so you can use Vin pin as 5V for sensors.
The board has a mini-USB port that is used to program the board and also for giving power.

Related Articles:
- Get Started With NodeMCU.
- Home Automation using NodeMCU ESP8266 and PHP Website.
- Smart Parking System Using IoT and Android App.
NodeMCU Pinout
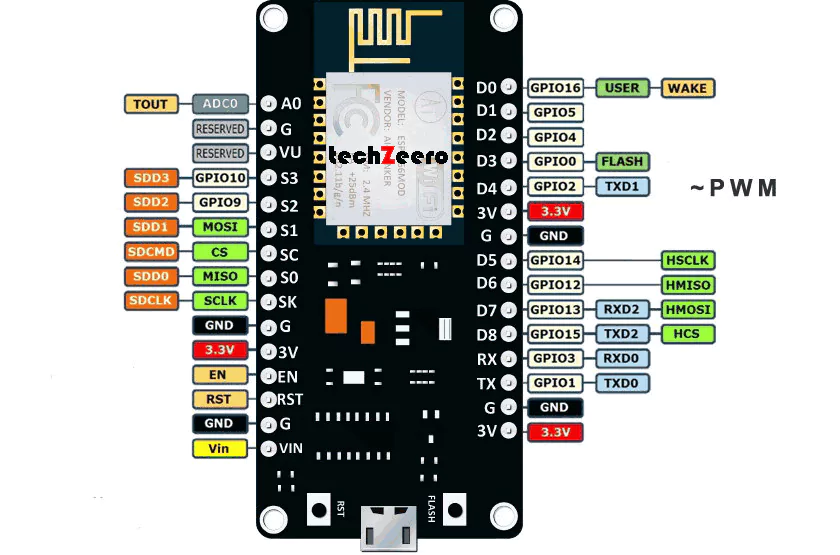
The NodeMCU board consists of a total of 30 pins, each serving a specific purpose in interfacing with various components and peripherals.
The main pins on NodeMCU include GPIO pins for digital input/output operations, power supply pins for connecting to external power sources, ground pins for proper grounding, and UART pins for serial communication. Additionally, there are ADC (Analog-to-Digital Converter) pins allowing you to read analog sensor values.
By referencing the pinout diagram of NodeMCU, you can easily identify which pin corresponds to which function and make the necessary connections accordingly.

Pin Names and GPIO Numbers
| Pin Names on NodeMCU Board | ESP8266 Internal GPIO Pin Number |
|---|---|
| D0 | GPIO16 |
| D1 | GPIO5 |
| D2 | GPIO4 |
| D3 | GPIO0 |
| D4 | GPIO2 |
| D5 | GPIO14 |
| D6 | GPIO12 |
| D7 | GPIO13 |
| D8 | GPIO15 |
| RX/D9 | GPIO3 |
| TX/D10 | GPIO1 |
| SD2D11 | GPIO9 |
| SD3D12 | GPIO10 |
NodeMCU Specifications
NodeMCU is a versatile development board based on the ESP8266 chip, offering a range of capabilities for IoT projects. When it comes to specifications, NodeMCU impresses with its 80 MHz clock speed and support for both 3.3V power supply and logic levels. It features built-in WiFi that supports WPA/WPA2 encryption protocols, making it ideal for connected devices.
With NodeMCU’s 4MB flash memory, you have ample space to store your programs and data without worrying about running out of storage. This board also includes GPIO pins for interfacing with various sensors and actuators, expanding the possibilities for your projects. Additionally, NodeMCU supports Lua scripting language which simplifies programming tasks.
Moreover, NodeMCU offers USB-TTL serial communication for easy debugging and uploading code to the board. Its compact size makes it suitable for embedding into small-scale prototypes or final products seamlessly.
| Specifications | ESP8266 | ES32 |
|---|---|---|
| MCU | Xtensa Single-Core 32 bit L106 | Xtensa Dual-Core 32 bit LX6 600 DMIPS |
| 802.11 b/g/n Wi-fi | Yes, HT20 | Yes, HT40 |
| Bluetooth | None | Bluetooth 4.2 and below |
| Typical Frequency | 80 MHz | 160 MHz |
| SRAM | 160 kBytes | 512 kBytes |
| Flash Memory | Serial Peripheral Interface Flash, up to 16 MB | Serial Peripheral Interface Flash, up to 16 MB |
| GPIO | 17 | 36 |
| Hardware/Software PWM | None/8 Channels | 1/16 Channels |
| SPI/I2C/I2S/UART | 2/1/2/2 | 4/2/2/2 |
| ADC | 10 bit | 12 bits |
| CAN | None | 1 |
| Ethernet MAC Interface | None | 1 |
| Touch Sensor | None | Yes |
| Temperature Sensor | None | Yes |
| Working Temperature | -40°C – 125°C | -40°C – 125°C |
Benefits of Using NodeMCU
NodeMCU offers a myriad of benefits for electronics enthusiasts and IoT developers. One key advantage is its built-in Wi-Fi module, allowing seamless connectivity to the internet for remote monitoring and control of devices. This feature opens up endless possibilities for smart home automation, industrial applications, and more.
Another benefit is NodeMCU’s compatibility with Arduino IDE, making it user-friendly even for beginners. Its Lua-based programming language simplifies coding tasks, enabling rapid prototyping and development of projects. Additionally, NodeMCU’s compact size and low cost make it an economical choice compared to other microcontrollers with similar capabilities.
Moreover, NodeMCU boasts a wide range of GPIO pins that can be easily configured for various input/output operations. This flexibility allows users to interface with sensors, actuators, displays, and other peripherals effortlessly. In essence, the versatility and affordability of NodeMCU make it an invaluable tool in the world of embedded systems design.
Projects That Can Be Built with NodeMCU
NodeMCU is a versatile development board that opens up a world of possibilities for DIY enthusiasts and IoT developers. With its built-in Wi-Fi connectivity and GPIO pins, NodeMCU can be used to create various exciting projects.
- One popular project idea is building a smart home automation system using NodeMCU. By connecting sensors and actuators to the board, you can control lights, appliances, and even monitor environmental conditions remotely through a mobile app or web interface.
- Another interesting project involves creating a weather station with NodeMCU. By interfacing temperature, humidity, and pressure sensors with the board, you can collect real-time data and display it on an LCD screen or upload it to the cloud for further analysis.
- Furthermore, NodeMCU can be used to develop IoT devices like smart door locks, security cameras, or even automated plant watering systems. The possibilities are endless when it comes to unleashing your creativity with NodeMCU.
Pros and Cons of using NodeMCU
When considering using NodeMCU for your projects, it is essential to weigh the pros and cons. The versatility, ease of use, and cost-effectiveness make NodeMCU a popular choice among IoT enthusiasts and developers. However, limited analog pins and compatibility issues with certain libraries can pose some challenges.