Introduction to Arduino and Voltage Measurement
In this tutorial, we will learn how to measure voltage using Arduino. By using Arduino and this voltage measuring sensor, we can measure voltages up to 25V.
We also display the voltage reading on an LCD 16×2 Display. In this article, we measure external voltage using Arduino. You can also call it a digital voltmeter.
For measuring the voltage we use an analog pin of Arduino.
Understanding Voltage and Why It’s Important
Voltage is a fundamental concept in electronics, measuring the potential difference between two points in a circuit. It represents the force that drives electric current through a conductor. Understanding voltage is crucial because it determines how components in a circuit will behave.
When working with Arduino projects, accurate voltage measurements are essential for ensuring proper functioning and safety. By measuring voltage, you can monitor power sources, detect faults, and optimize performance.
Types of Voltage Measurements
When it comes to measuring voltage with Arduino, there are various types of voltage measurements that can be performed.
One common method is DC voltage measurement, which involves measuring the steady-state voltage level of a direct current source. This type of measurement is essential for many electronic circuits and devices.
Another type is AC voltage measurement, which is used to measure the alternating current in a circuit. This type of measurement is crucial for applications like power distribution systems and home appliances.
Additionally, there are differential voltage measurements where the potential difference between two points in a circuit is measured. This type of measurement can help detect faults or irregularities in a system.
Components Needed
- Arduino.
- Battery (up to 25V).
- Resistors.
- LCD Display 16×2.
- Jumper Wires.
Circuit For Voltage Sensor
Building a circuit for a voltage sensor involves carefully selecting the appropriate resistors, capacitors, and other electronic components to ensure precise measurements. The design must consider factors such as input range, sensitivity, and noise levels to achieve reliable results.
Below is the circuit of the voltage sensor.
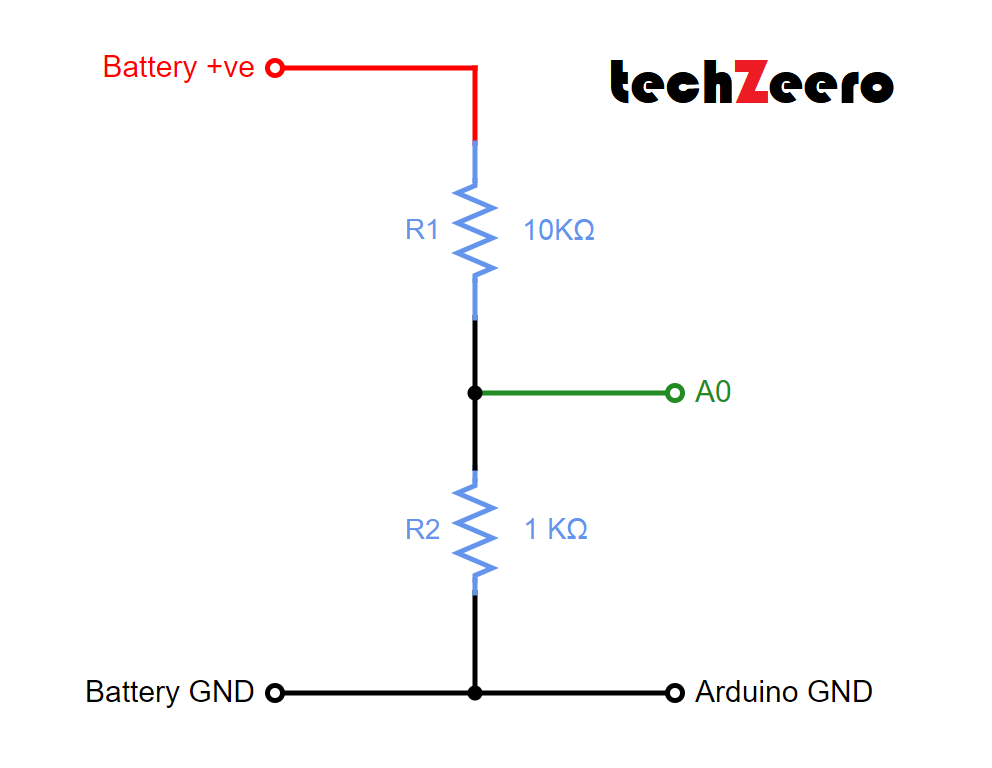
Note:- If you are measuring the voltage of 25V use R1 = 35Kohms and R2 = 7.5Kohms. It will save your Arduino Analog Pin.
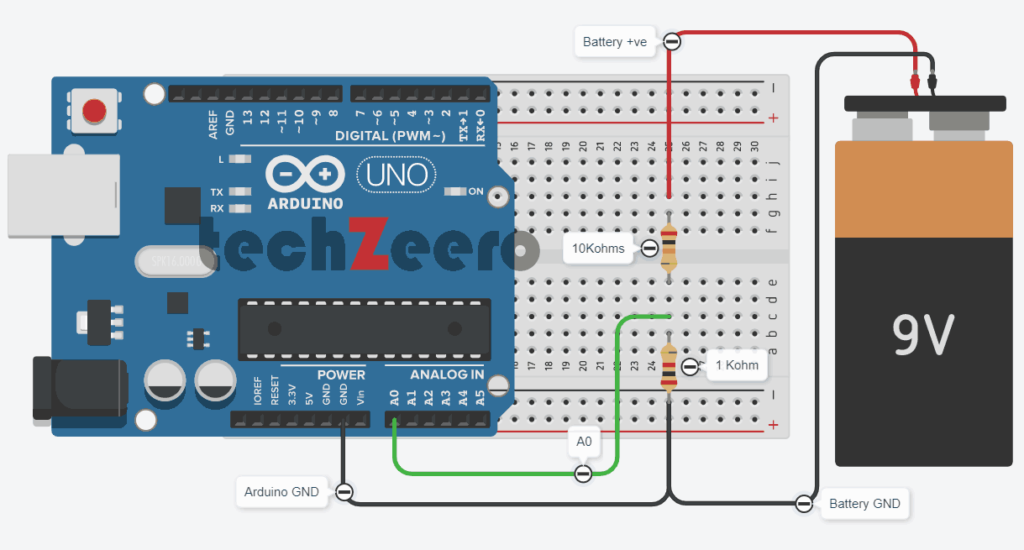
Interfacing a Voltage Sensor with Arduino
It is very simple and straight forward to measure the voltage. Follow the below circuit diagram and make sure you use the correct resistors.
Circuit Diagram for Measure Voltage with Arduino
The circuit diagram will show how the Arduino board interfaces with the voltage sensor to accurately measure voltage levels. Each component plays a crucial role in capturing and processing electrical signals.
By following the schematic closely, you ensure that your connections are correct and secure. This step is vital in preventing any potential errors or malfunctions down the line.
The clear layout of a circuit diagram simplifies troubleshooting processes if issues arise during testing. It acts as a roadmap guiding you through intricate electronic pathways towards accurate voltage measurements.
Code for Measure Voltage with Arduino
To measure voltage accurately, you’ll need to write a clear and concise code that communicates with the Arduino board effectively. This involves setting up your analog input pins, defining variables, and implementing the necessary calculations.
Your code should include functions to read the analog voltage values from your sensor and convert them into meaningful data. Remember to pay attention to detail and ensure that your code is error-free to obtain accurate readings.
Upload the below code and open the serial monitor to view the voltage readings.
This sketch relies on the fact that the analogRead value is a ratio of the measured voltage to the reference. But because the measured voltage is divided by two dropping resistors, the analogRead value needs to be multiplied to get the actual voltage.
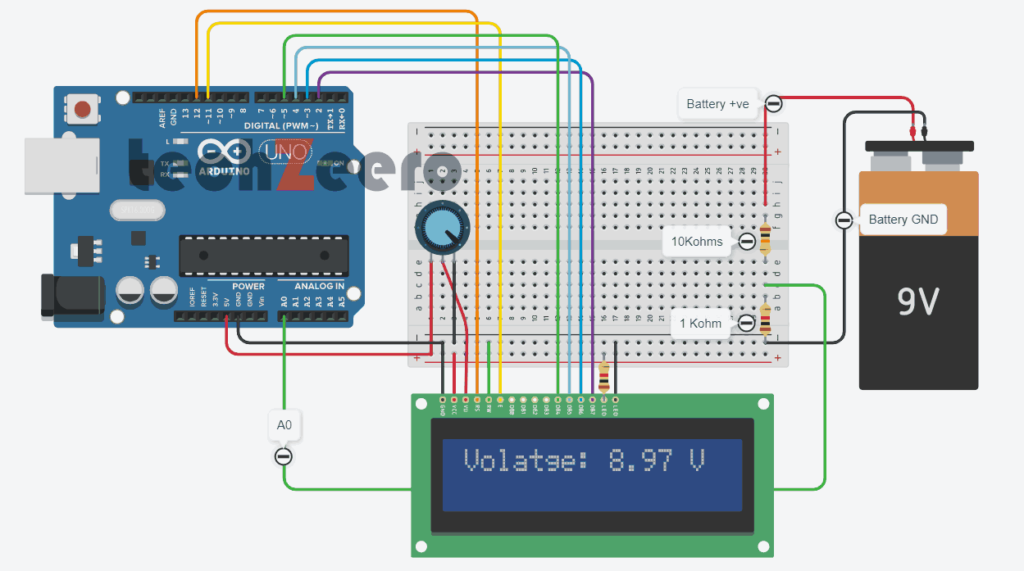
Display Voltage Readings on an LCD Display 16×2
When it comes to displaying voltage readings on an LCD display 16×2 using Arduino, you can create a user-friendly interface that provides real-time data visualization.
Now we will display the voltage readings on an LCD display. So for this, we have to connect the LCD display with Arduino.
Must Read:
Circuit Diagram of Voltage sensor and LCD 16×2
The diagram showcases the intricate interplay between the voltage sensor, Arduino board, and the LCD display. Each element plays a crucial role in accurately measuring and displaying voltage readings.
Code for Voltage Sensor and LCD Display
You will need to specify how the analog readings from the voltage sensor translate into actual voltage values that can be displayed on the LCD screen. This typically involves mapping out the range of analog values received from the sensor to corresponding voltages.
Additionally, you may want to include functions that control when and how frequently these readings are updated on the LCD display. This helps in ensuring real-time monitoring of voltage levels without overwhelming or cluttering up your display interface.
Responding to Change in Voltage
Monitor one or more voltages and take action when the voltage rises or falls below a threshold.
For example, to flash an LED to indicate a low battery level, perhaps to start flashing when the voltage drops below a warning threshold and increasing in urgency as the voltage drops further.
This example starts flashing an LED at 1.2 volts and increases the on-to-off time as the voltage decreases below the threshold. If the voltage drops below a second threshold, LED stays lit:
Code for Responding on Change in Voltage
The line if (val < (warningThreshold * 1023L)/5000) in this sketch calculates the ratio of the value read from the analog port to the value of the threshold voltage.
For example, with a warning threshold of 1 volt and a reference voltage of 5 volts, you want to know when the analog reading is one-fifth of the reference voltage.
The expression 1023L tells the compiler that this is a long integer, so the compiler will promote all the variables in this expression to a long integer to prevent overflowing the capacity of int (a normal 16-bit integer).
When reading analog values, you can work in the units that are returned from analogRead, ranging from 0 to 1023, or you can work in the actual voltages they represent.
As in this sketch, if you are not displaying voltage, it’s simpler and more efficient to use the output of analogRead directly.
Troubleshooting Common Issues
Encountering issues while measuring voltage with Arduino can be frustrating but fear not, as troubleshooting common problems is part of the learning process.
- If you are getting inaccurate readings, double-check your connections to ensure they are secure and correctly placed. Sometimes a loose wire can throw off the entire measurement.
- Another issue could be related to the code. Make sure you have uploaded the correct sketch and that there are no syntax errors causing discrepancies in your readings. Additionally, check if the components used in your circuit are compatible with each other.
- If you’re still facing trouble, consider testing each component separately to pinpoint where the problem lies.
Practical Applications and Projects Using Arduino for Voltage Measurement
Looking to put your Arduino skills to practical use? Measuring voltage with Arduino opens up a world of possibilities for exciting projects and applications.
- One popular application is building a battery level indicator that displays the remaining charge on an LCD screen. This project can be particularly handy for monitoring batteries in various devices, from toys to remote controls.
- Another interesting project involves creating a solar power monitor using Arduino to measure the voltage output of solar panels. This allows you to track the efficiency of your solar setup and optimize its performance.
- For those interested in home automation, measuring voltage with Arduino can help in designing smart energy management systems that track power consumption and optimize usage based on real-time data.